What is the ID4i API?
The ID4i API is an HTTP API that allows developer to implement applications on top of ID4i. This provides for automating GUIDs creation and object registration, working with Collections of GUIDs and Routing.
Organizations can implement and host their own applications to automate workflows operating on single, uniquely identifiable workpieces. Additionally, organizations can and share GUIDs and attached data with other organizations and transfer the GUID ownership to partner organizations.
Both JSON and XML representations are supported by all HTTP endpoints.
The application consists of four areas:
-
/- serves the ID4i UI and public services; publicly accessible -
/accounts- hosts public services to work with user accounts; publicly accessible -
/docs- hosts documentation; publicly accessible -
/api- root of the ID4i API; requires authentication and authorization.
You can find a detailed, browseable description of all API operations and data types in the API Reference
Quick Start Guide
The following steps will help you to get started using ID4i. We will register and activate an account and call an ID4i service from the command line
-
Register an account: https://backend.id4i.de/#/register
-
Check your Inbox and activate your account
-
Sign in https://backend.id4i.de/#/login
Now you are ready to explore the ID4i web interface.
To connect to ID4i with your application or with an HTTP client, you need to
-
Login with the previously registered user at https://backend.id4i.de/#/login using username or email and password.
-
Retrieve the content of the
Authenticationresponse header (a JWT token that looks something like thisBearer eyJhbGciOiJIUzUxMiJ9.eyJzdWIiOiJIaSB0aGVyZSwgd2VsY29tZSB0byBJRDRpIiwiZXhwIjo0Mn0.ED2hM2qi0f74AN5V6-MBoUP-4o5A8n1n6r8x4EqsrJQ; head over to https://jwt.io/ to learn more) -
Call another service (
api/v1/infois a good starting point) and send that token back to the server with your request in theAuthorizationrequest header.
You can find an example at User login example using curl. The services you used in are documented here and here.
To learn more about further available services, please refer to the API Reference.
| In this quick start guide, you have connected to ID4i using your personal user account. To be able to connect your own application to Id4i, you now need to use API Keys to link your application to Id4. |
Before you start building a client from scratch, please have a look at the pre-built Client Libraries we prepared for you.
Getting Support
We are very much interested in seeing you succeed using our platform, so we are there to help if you get stuck. You can reach out to us by hopping onto our gitter chat channel or by opening an issue here.
Besides this document you can also check out …
-
… the API Docs,
-
… and the client libraries in Java and Javascript
Don’t hesitate. We’re actual humans and looking forward to get in touch.
Core Concepts
This section gives a brief overview over the main business objects within ID4i and their usage.
The concepts below are ordered alphabetically (with the exception for Authentication & Authorization to match the API documentation) for easy reference. However, if you are just familiarizing yourself with ID4i, we suggest you go through the topics in the following order:
-
… followed by the remaining topics in no particular order.
Authentication & Authorization
All ID4i resource URLs below /api are protected. To access these locations, incoming requests need to be authenticated
and authorized. To do so, each request needs to send an authorization token along in the Authorization: HTTP header. We use
JWTs as Bearer tokens as described in the OAuth2 Specification.
Requests can either come in the context of a registered User or from an Application using the ID4i API. How the bearer
token is constructed is different is these two scenarios.
To obtain a User token, simply log in, i.e. POST your credentials (username and password) against login.
To make a request from an API client, you must have an API Key created in the ID4i UI in advance. This key, along with a secret,
is used in the client to create and sign a token that is sent with each request. Both authentication flows are shown in the
diagrams below.
User Authentication Flow
User authentication is used for interactive sessions with ID4i, i.e. if a user uses some kind of graphical or commandline interface to perform tasks within ID4i.
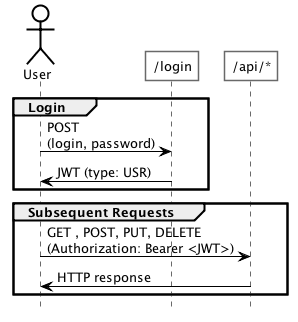
# Login
$ curl -i --request POST \
  --url https://backend.id4i.de/login \ (1)
  --header 'content-type: application/json' \
  --data '{
        "login": "Your User", (2)
        "password": "Your password" (3)
}'

HTTP/1.1 200 OK
 ...
Date: Sat, 25 Nov 2017 07:32:07 GMT
Authorization: Bearer eyJhbGciOiJIUzUxMiJ9.eyJzdWIiOiJhZG1pbiIsImV4cCI6MTUxMTYxNjcyN30.P8_NJUT7lwZFYfuESwjGvwMpyowH7h8NGyvya1fX7O9DMSKTGPvSjJaZQ21blpF8IibKPNxWk9T5Do8LWtXIlw (4)
Content-Length: 0
...

# Subsequent requests
$ curl --request GET \
    --url https://backend.id4i.de/api/v1/info \
    --header 'accept: application/xml' \
    --header 'accept-language: en' \
    --header 'authorization: Bearer eyJhbGciOiJIUzUxMiJ9.eyJzdWIiOiJhZG1pbiIsImV4cCI6MTUxMTYxNjcyN30.P8_NJUT7lwZFYfuESwjGvwMpyowH7h8NGyvya1fX7O9DMSKTGPvSjJaZQ21blpF8IibKPNxWk9T5Do8LWtXIlw' \ (4)

<AppInfoPresentation><name>ID4i</name><revision>6496845</revision><branch>develop</branch><commitTime>2017-11-25T01:30:28+0000</commitTime></AppInfoPresentation>| 1 | The actual URL may differ on test and production systems |
| 2 | User name and … |
| 3 | … password |
| 4 | The authorization header sent as JWT from the server |
API Key Authentication Flow
API Key are used to allow automated processes to authenticate against ID4i. This is used for integration with other backend systems like ERPs or PIMs, smartphone apps or manufacturing devices. In this scenario, the client is responsible for creating the access token.
Authenticity is established by cryptographically signing the access token using either
-
a pre-shared secret the server and client know but which is not exchanged with the message (HMAC)
-
an asymmetric cryptographic signature. The client signs the token with his secret private key, the server validates it using the corresponding public key (RSA)
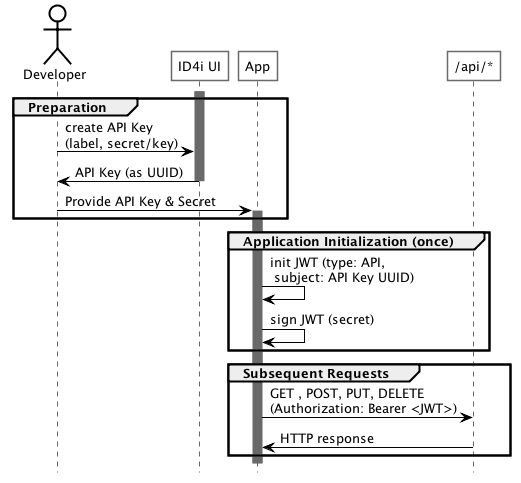
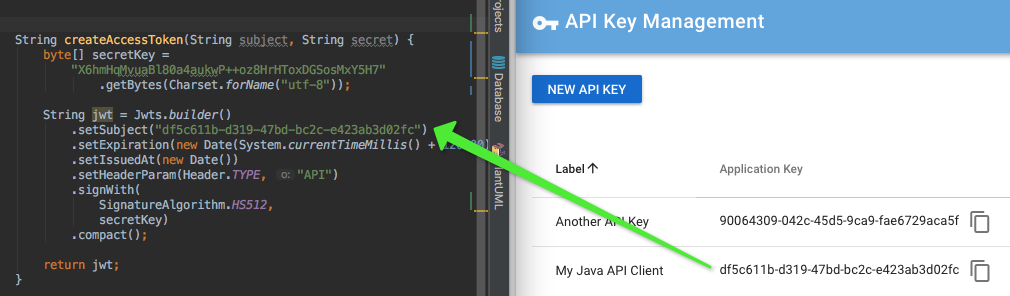
To create a valid Application token, you need to provide the following JWT properties:
-
subject - the API Key as UUID
-
expiry date - the point in time when the token expires. Do not use longer periods than a few minutes and recreate the token after that time for security reasons.
-
issue date - the point in time when the token was created
-
type -
APIfor API Key tokens. User tokens will have the typeUSR -
signature - you must sign the token with your secret or your private key. Supported signature algorithms are HMAC 512 and SHA 256 + RSA.
An example of how to create a JWT in Java using JJWT is shown below. Additional libraries for creating JWTs can be found at https://jwt.io/.
For further code samples please refer to Client Libraries.
import io.jsonwebtoken.Header;
import io.jsonwebtoken.Jwts;
import io.jsonwebtoken.SignatureAlgorithm;

...
byte[] secretKey = "my secret secret 09345".getBytes(Charset.forName("UTF-8")); (5)
String jwt = Jwts.builder()
  .setSubject("e94b006-d1d9-11e7-8941-cec278b6b50a") (1)
  .setExpiration(new Date(System.currentTimeMillis() + 120000)) (2)
  .setIssuedAt(new Date()) (3)
  .setHeaderParam(Header.TYPE, "API") (4)
  .signWith(SignatureAlgorithm.HS512, secretKey) (5)
.compact();| 1 | API Key UUID |
| 2 | Expire the token after two minutes |
| 3 | Set the token creation date |
| 4 | Set the JWT type to API |
| 5 | Sign the token using HMAC with (the bytes of) the key’s secret |
| A detailed description of the available permissions and their administration is not yet available. Please contact us if you have any questions regarding this area. |
Permissions
All operations are guarded by permission checks. Permissions can be attached to users via predefined roles and to API Keys directly. User roles are given to users in the context of Organizations. A user belongs to all Organizations he has at least one role in. The currently predefined roles are:
-
Admin: All permissions -
Guid Manager: All permissions to work with GUIDs and Collections -
Warehouse Manager: All permissions to read GUIDs and Collections and to write logistic collections.
The roles are given to a user via inviting him to an organization (Users → Invite Users)
or editing when he is already part of the organization (Users → <User> → Edit) in the web UI.
It is possible to invite users that are already registered in ID4i as well as inviting new users using their email
address. New users will get an email and are prompted to finish their registration.
We do not support creating custom roles as of now. If you have additional requirements for roles, please get in touch.
There are two kinds of permissions: global permissions for certain actions (e.g. to create GUIDs or add and remove Aliases and read private routes) and permissions in the context of ID4iObjects
like GUIDs and Collections (e.g. create, list, read and delete documents for a certain ID4iObject).
Several permissions can be given either globally or per ID4iObject (e.g. write documents or data).
Per ID4iObject permissions are only supported for API Keys. For API clients, this allows you to give different clients different sets of permissions via API Keys. You can access the administration
interface in the web UI at API Keys → <Key> → Edit.
The complete list of permissions can be found in the API key properties in the web interface and can also be obtained using the API at https://backend.id4i.de/docs/redoc/index.html/#operation/listApiKeyPrivileges.
Accounts
The accounts API allows the administration of user accounts. This API is partly publicly available without authentication for user login, registration, password resets and the like. However, a typical API client will not need to use these.
Other services allow for retrieving Organizations of users and their roles.
See https://backend.id4i.de/docs/redoc/index.html#tag/Accounts for all available services.
Aliases
GUIDs can be retrieved using aliases. ID4i supports aliases for single workpieces
(i.e. one alias identifies one GUID) and aliases for lists of workpieces (i.e. one alias points to a list
of GUIDs).
An alias consists of the GUID it points to and an alias type. Supported alias types are item
(company single workpiece ID), mapp (MAPP code) and rfid (RFID code) for single GUIDs and
gtin (EAN / GTIN codes), eclass and unspsc as well as tracking (shipment tracking) and article
(company article ID) for multiple GUIDs.
Single workpiece alias types can have only GUID per and alias type, group aliases can have multiple
GUIDs for each alias type and value.
Aliases can be used for two purposes: to search for GUIDs and to pass aliases to other services during Routing.
Some aliases can be viewed in public (gtin and article). To view other aliases, the privilege READ_PRIVATE_ALIAS is
required. This is also important for Routing: Only public aliases can be used in public routes. In private routes,
private aliases can be used in addition.
Aliases are not attached to a certain organization but are visible to anyone having viewing permissions of the aliased GUID
|
| Aliases also work for collections to allow for attaching external logistic service tracking IDs or internal IDs for batches, e.g. |
API Keys
Api Keys are used in lieu of user name and password authentication for third party applications to be able to connect to ID4i. Keys are registered using the ID4i API. Every request against the Id4i API must be signed with an Api Key to be processed.
For further details see Authentication & Authorization.
The relevant backend services are described in detail at https://backend.id4i.de/docs/redoc/index.html#tag/Api-Keys
Billing
Billing services let you retrieve a summary of fees for an organization. A typical API client will not need to use these services. However, they can be useful to set up some cost based monitoring.
See https://backend.id4i.de/docs/redoc/index.html#tag/Billing for details.
Collections
A collection is a list of GUIDs with optional additional properties. We provide three different Collection types
to group GUIDs for three different purposes:
-
Labelled Collectionsprovide a logical handle for all containedGUIDs, eg. "all star wars themed rubber ducks". A labelled collection consists of theGUIDlist and the label. -
Logistic Collectionsare used to define batches that are shipped in one package. -
Routing Collectionsallow to define common Routing options for a list ofGUIDs
Although collections are associated with GUIDs, a collection must not contain other collections.
| labelled collection | routing collection | logistic collection | |
|---|---|---|---|
associated with a GUID |
yes |
yes |
temporarily |
content is private |
yes |
yes |
yes |
content may be shared |
yes |
||
transferable ownership |
yes |
||
specifies routing of content |
yes |
||
unique name / label |
yes |
yes |
yes |
For each collection type, the following services are provided:
-
Create collection
-
Add single element to collection
-
Add multiple elements to collection
-
Remove single element from collection
-
Remove multiple elements from collection
The relevant backend services are described in detail at https://backend.id4i.de/docs/redoc/index.html#tag/Collections
Events
Events allow your application to react to external stimuli like the scan of GUIDs, the creation or the ownership transfer of new GUIDs and Routing of GUIDs.
| Events are not yet available in this version of ID4i. |
GUIDs
The GUID is the a globally unique identifier of an arbitrary physical (or even virtual) object. A GUID is first created in ID4i and
obtained by a client application. Then, it is typically attached to a physical object in a permanent manner (e.g. etched/lasered in, durable stickers).
GUIDs are transferred as simple strings for API calls. When referring to GUIDs in API calls
Id4n and GUID can be used interchangeably in most cases. For details, see below.
A GUID can be found using its ID string or using aliases. ID4i supports aliases for both single workpieces (e.g. MAPP-Codes) and for
articles (e.g. GTIN or EAN). These aliases can be assigned freely.
GUIDs have the following properties:
-
Length 6 - 255
-
Allowed characters: -, 0-9, a-z, A-Z
-
Can be used in URLs without escaping characters / URL encoding
-
There are no practical upper limits in the number of GUIDs of a length greater than 56 (5,76 Gogol)
-
The GUID owner cannot be deduced from the GUID alone (required for private labelling)
-
The GUID creator cannot be deduced from the GUID alone (required for private labelling)
-
GUIDs created in a row do not exhibit a common format or pattern that would allow deductions on whether they are owned by the same entity or are workpieces of the same product.
The relevant backend services are described in detail at https://backend.id4i.de/docs/redoc/index.html#tag/Guids
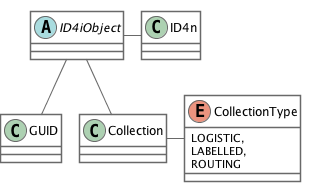
When working with the API, you may also come across the terms GUID, ID4n, ID4iObject. To clarify the meaning to of these terms
the following outlines the model of the ID classes used in ID4n.
-
ID4n - the actual identifer
-
ID4Object - an object identified by the ID4n. Can be e.g. a GUID or a Collection.
-
GUID - a sub type of ID4Object representing a single workpiece identified by an ID4n.
-
Collection - a collection of GUIDs. Each GUID is identified by an ID4n, the collection itself is also identfied by an ID4n. The collection has a type of
labelled,routingorlogistic. A collection has additional information like a label and a visibility across organizations. See also Collections.
History
Each GUID has a history that is recorded and stored in an immutable way in ID4i. History items can either be created automatically by certain business actions or manually using an API client.
An history item has the following properties:
-
It carries a timestamp
-
It has an history item type. Available types are listed at https://backend.id4i.de/docs/redoc/index.html#operation/addItem
-
It has visibility restrictions like documents. A history item can be
public(visible for anyone),private(visible only for the owning organization) orshared(visible for a specific list of organizations). See #_visiblity -
It carries the organization that created the history item
-
Only the visibility can be changed after the history item is created
All public history items of the GUID owner are shown on the public whois page.
When an item is transferred, a link to each original history item is stored as private item in the receiving
organization (again, just like what happens with documents on transfer). The receiving organization can decide to make these
items public by changing the visibility (https://backend.id4i.de/docs/redoc/index.html#operation/updateItemVisibility). Note that history item
itself cannot be changed.
Please also refer to Private Labelling for the rationale behind visibility restrictions.
The items created automatically are:
-
CREATED- when the physical state of a GUID becomesATTACHED, i.e. a workpiece is marked with a GUID. See https://backend.id4i.de/docs/redoc/index.html#operation/updateGuid -
DESTROYED- when the physical state of a GUID becomesDETACHED, i.e. a workpiece marked with a GUID or the marking is destroyed. See https://backend.id4i.de/docs/redoc/index.html#operation/updateGuid -
SHIPMENT_PREPARED- when a GUID transfer is prepared, see https://backend.id4i.de/docs/redoc/index.html#operation/prepare -
RECEIVED- when a GUID transfer is accepted, see https://backend.id4i.de/docs/redoc/index.html#operation/receive
Other items are created by API clients using https://backend.id4i.de/docs/redoc/index.html#operation/addItem as required to allow business process auditing.
History items can carry optional additional properties. Supported properties are:
-
de.id4i.history.item.qualifier- a qualifier for the history item, e.g. to distinguish different processes. You could have aREPROCESSING_STARTEDonce with a qualifierRegrindingand once with the qualifierCoating. -
de.id4i.history.item.reference- an external reference for the history item, e.g. to distinguish orders that contained the GUID at different times. You could have aREPROCESSING_STARTEDonce with a referenceOrder-123and later another one with the referenceOrder-456. This tells you which orders (as identified by the reference in an external system) triggered the first and second reprocessing processes respectively. -
de.id4i.history.item.next.<history item type>.<process timing type>- to specify the timestamp (UTC in seconds) until the specified history item type is expected next to be reached; with-
<process timing type>one of-
earliest(expect the next step of the specified type at<timestamp>at the earliest) -
latest(expect the next step of the specified type at<timestamp>at the latest) and -
estimated(expect the next step of the specified type at roughly<timestamp>)
-
-
and
<history item type>as one of the supported types
-
Example: de.id4i.history.item.next.RECYCLED.estimate = 7955114522
Images
The image service is responsible for resolving images. Currently it is used only for the Organization logos.
Meta Information
The meta information services provide information about the version of the API to distinguish different versions and stages like test, sandbox and production.
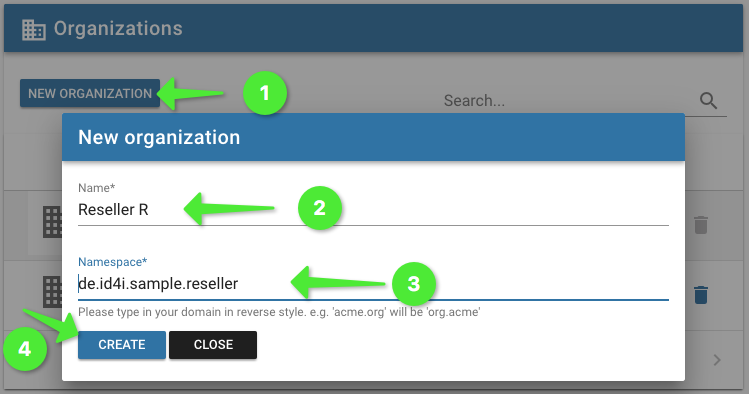
Organizations
Most information (e.g. GUIDs, Collections, API Keys) in ID4i belong to a single organization. Users can belong to different organizations and have a different set of permissions in each one of them.
The organization services can be used to work with organization data (addresses, names, logos) and to add and remove users from organizations.
Each organization has a unique namespace, typically the organizations domain and a department or subsidiary in reverse notation, e.g. de.id4i.department.
Organizations are identified in API calls using this namespace. Additional data within other applications (like BarCollect) will be typed using these
namespaces as well.
GUIDs can be transferred from one organization to another. This is used when workpieces identified by GUIDs are sold or processed by different organization across the value stream.
Information stored in Storage can be visible either publicly or privately within only one organization. When GUIDs are transferred between organizations, the corresponding public data of the source is copied to the private data of the target organization. For additional data structuring, sharing and hiding information, please have a look at BarCollect.
Auditing
Auditing services allow to review changes made by users or api keys e.g. they allow you to retrieve a changelog with changelog entries.
See https://backend.id4i.de/docs/redoc/index.html#tag/Auditing for details.
Changelog
The messages of a change log can be resolved in a specified Mimetype format.
If the messages are rendered as e.g. text/mustache every ChangeLogEntry will contain messageProperties with a map of message property keys and corresponding objects/values.
{
  "offset": 0,
  "limit": 100,
  "total": null,
  "elements": [
    {
      "id": "e4",
      "message": "{{&actor}} hat den Api Key {{&apiKey}} {{#newActiveState}}aktiviert{{/newActiveState}}{{^newActiveState}}deaktiviert{{/newActiveState}}",
      "messageProperties": {
        "actor": {
          "value": "a.vratny",
          "type": "user",
          "id": "a.vratny"
        },
        "apiKey": {
          "id": "d6afe146-b952-459a-93df-5c1108ebff6e",
          "type": "apikey",
          "value": "My Api Key"
        },
        "newActiveState": true
      },
      "timestamp": 1521469408
    },
    {
      "id": "e3",
      "message": "{{&actor}} hat den Api Key {{&apiKey}} angelegt",
      "messageProperties": {
        "actor": {
          "value": "a.vratny",
          "type": "user",
          "id": "a.vratny"
        },
        "apiKey": {
          "id": "d6afe146-b952-459a-93df-5c1108ebff6e",
          "type": "apikey",
          "value": "My Api Key"
        }
      },
      "timestamp": 1521469367
    }
  ]
}
Every message property that contains an object provides a value field that can be rendered regardless of the type provided.
The following ID4i types can be interpreted:
-
Organization:
{"type": "organization", "value": <Name of Organization>, id: <ID of organization>} -
ID4n:
{"type": "id4n", "value": <id4n>, id: <Id4n>} -
Document:
{"type": "document", "value": <id>, id: <id>, id4n: <id4n>} -
Api-Key:
{"type": "apikey", "value": <Label of ApiKey>, id: <Key of ApiKey>} -
User:
{"type": "user", "value": <Username>, id: <username>} -
User-Role:
{"type": "userRole", "value": <Role>, id: <Role>} -
ID4n Object Type:
{"type": "id4nType", "value": <I18n translation of type>, id: <Enum name>} -
List:
{"type": "list", "value": <description>, id: […], "subType": <ID4iType>} -
Field subtype:
{"type": "list", "value": <description>, id: […], "subType": "field"} -
E-Mail-Address:
{"type": "eMailAddress", "value": <email>, id: <email>}
Public Services
Routing
Routing refers to the ability to send GUIDs along with some meta information to
further web addresses (and later other network destinations). An example is that
all items within a batch (e.g. from a routing collection) are sent to an ERP
system once they have been scanned upon arrival.
Routing can be triggered manually, by calling a service from a client application or
based on events that occur within ID4i, e.g. GUID creation or retrieval.
Routes can be public or private. Public routes are used to send anonymous web users to a shop or a product information page. Private routes are used by API clients to connect to nearly arbitrary internal systems.
The relevant backend services for creating and maintaining routes are described in detail at https://backend.id4i.de/docs/redoc/index.html#tag/Routing
To publicly route a specific GUID, please refer to https://backend.id4i.de/docs/redoc/index.html#operation/go Private routes can also be retrieved using the services described at https://backend.id4i.de/docs/redoc/index.html#tag/Routing.
Routes are defined within Routing Files.
Within routes, several variables can be used to interpolate the redirection URL with data from the GUID that is being
routed based on URI templates as defined in RFC 6570 URI Template
In the simplest case, variables enclosed in braces (e.g. {id4n} for the GUID) are replaced by the corresponding value of
the GUID being routed. Advanced URI template syntax is supported as well.
The following parameters are supported:
-
id4n -
alias_(ean | gtin | article | mapp | item | rfid | tracking | unspsc | eclass )
Examples:
-
Given
id4n=jdoai3wu32the templatehttps://id4i.de/go/{id4n}expands tohttps://id4i.de/go/jdoai3wu32. -
Given
alias_gtin=1928347918the templatehttps://google.de/search?q={alias_gtin}expands tohttps://google.de/search?q=1928347918. -
Given
id4n=jdoai3wu32andalias_article=123456, the templatehttps://id4i.de/go/{id4n}{?alias_article:4,id4n:2}expands tohttps://id4i.de/go/jdoai3wu32?alias_article=1234&id4n=jd.
{
    "options": {
      "deleteOutdatedRoutes": true (1)
    },
    "routes": [ (2)
      {
        "type": "web", (3)
        "priority": 100, (4)
        "public" : true, (5)
        "params": {
          "url": "https://www.google.de/search?q={id4n}", (6)
          "title": "Google" (11)
        }
      },
      {
        "type": "web",
        "priority": 200,
        "params": {
          "url": "http://my-internal-system.company.de/item-no={alias_item}" (7)
        }
      },
      {
        "type": "web",
        "priority": 10,
        "validUntil": 1519634266, (8)
        "params": {
          "url": "http://server2.example.de/myid={id4n}"
        }
      },
      {
        "type": "tcp", (9)
        "priority": 50,
        "params": {
          "host": "78.125.85.6",
          "port": 7634,
          "payload": "ID gescannt: {alias_rfid}" (10)
        }
      }
    ]
}| 1 | Set to true to turn off returning outdated routes from https://backend.id4i.de/docs/redoc/index.html#operation/getRoute and https://backend.id4i.de/docs/redoc/index.html#operation/getRoutingFile |
| 2 | List of all route objects |
| 3 | Route object property type; web or tcp. web sends the GUID to another URL |
| 4 | Route object property priority; integer. when a GUID routing is performed, use the matching route with the highest priority |
| 5 | Route object property public; boolean. Allows unauthenticated processes to use this route. Typically used for sending visitors to a web shop or public web site. |
| 6 | Web URL to send the GUID to. The actual GUID can be sent as part of the URL (as path segment or query parameter) using the placeholder {id4n}. This example searches google for the GUID. |
| 7 | Non public route to an internal system using an alias; note that the public param has been omitted. |
| 8 | Route with validity end date; timestamp (seconds since 1970-01-01); February 26, 2018 9:37:46 AM GMT+01:00 in this example. |
| 9 | Example for a tcp route |
| 10 | For tcp routes, instead of the url parameter, the host, port and payload parameters are used. {{alias_rfid}} is replaced in the payload parameter. |
| 11 | Optional title for the route. This title is displayed in the UI as link title for web routes. |
Only public aliases, i.e. alias_gtin and alias_article may be used in public routes. In private routes, all
aliases can be used. However, when interpolating such a route, the privilege READ_PRIVATE_ALIAS is checked in the context
of the GUID being routed.
|
| Further route types for specialized protocols are actively being developed. If you need support for other protocols, please reach out to us. |
Storage
Data storage on ID4i offers two possibilities to exchange data attached to GUIDs. The first way, micro storage
allows you to attach up to 1kB of arbitrary data to a GUID. This data can only be read within your organization and is
typically used to allow internal tools and workstations to talk about a GUID amongst each other.
The second way is to attach documents to a GUID. These documents can be either private to your organization, publicly available or shared with other organizations.
The organization owning the GUID always controls the public visibility of all attached documents.
When a GUID is transferred to another organization, the public documents of the previous owner are copied to the private
storage area of the receiving organization. The receiver may then choose to keep the documents private or to republish them.
All private documents regarding a GUID also stay in the private storage area regardless of whether the GUID is transferred.
This allows you to keep internal documents around in case you get an item back for maintenance or warranty cases.
The services for working with storage are described in detail at https://backend.id4i.de/docs/redoc/index.html#tag/Storage and additionally at https://backend.id4i.de/docs/redoc/index.html#tag/Public-Services for public documents.
To be able to use shared documents, you need to have the (additionally charged) sharing module enabled.
Please contact us if you want to use it.
|
The following constraints for using documents and micro storage apply in ID4i:
-
Maximum size per document: 10MB
-
Maximum number of documents per GUID: 10
-
Maximum micro storage size per GUID: 1kB
If these constraints are too tight for your use case, please contact us.
| We will provide the possibility to reference documents that reside in storages within your own organization on your own systems. If you are interested in that particular feature, please let us know. |
WhoIs
The WhoIs service provides public information about GUIDs like the ID, the owner and the owner address.
For more information see https://backend.id4i.de/docs/redoc/index.html#tag/Whois
Common API Elements
The HTTP API provides a consistent set of services to carry out business processes in ID4i. These services share a common set of properties that are described below.
Request headers are used to tell the server which data format you want to retrieve (Content Types), which language the client is accepting (Language) and to authorize requests (see Authentication & Authorization).
All server side errors are rendered in a common format described in Error Representation, lists of objects that may be to large to fit into one request are delivered as Pageable Objects.
We use HTTP status codes in a fairly standard way, however, HTTP Status Codes gives you an overview.
Content Types
All API endpoints are able to return both JSON and XML representations. The client decides which
representation to use via the standard HTTP Accept: header.
To retrieve JSON, send the `Accept: application/json header, to retrieve XML send Accept: application/xml
$ curl --request GET \
    --url https://backend.id4i.de/api/v1/info \
    --header 'accept: application/xml' \ (1)
    --header 'authorization: Bearer ...'

$ curl --request GET \
    --url https://backend.id4i.de/api/v1/info \
--header 'accept: application/json' \ (2)| 1 | request XML |
| 2 | request JSON |
<AppInfoPresentation>
  <name>ID4i</name>
  <revision>6496845</revision>
  <branch>develop</branch>
  <commitTime>2017-11-25T01:30:28+0000</commitTime>
</AppInfoPresentation>{
"name": "ID4i",
"branch": "develop",
"revision": "6496845"
"commitTime": "2017-11-25T01:30:28+0000",
}Language
The ID4i API supports English and German languages in the backend. This is primarily relevant for (error-) messages and emails sent from ID4i.
When logging in through the user interface, the language from browser locale is used to select the language for the UI and all subsequent API calls made from the UI to the backend.
When calling services through an other client, e.g. an Java, command line or Javascript application, the
desired language can be specified in the Accept-Language header. Valid values are de and en.
`
.Example: Invalid registration request German (curl)
$ curl --request POST \
  --header "Accept-Language: de" \ (1)
  --header 'Content-Type: application/json' \
  "errorId":"f050bb74-b501-4f60-a8f4-4a5b731615f2",
  "errorList":
    [
     {"message":"Feld \"password\" darf nicht leer sein", ...}, (2)
     {"message":"\"meh\" ist keine gültige Email-Adresse.",.. },
     {"message":"Feld \"username\" darf nicht leer sein",... }
    ]
}| 1 | Set language to German |
| 2 | German validation messages in response |
$ curl --request POST \
  --header "Accept-Language: en" \ (1)
  --header 'Content-Type: application/json' \
  --data '{"email":"meh"}' https://backend.id4i.de/account/registration

{
  "message":"Validation failed",
  "code":"ERR_INPUT_VALIDATION_FAILED",
  "errorId":"250e72cc-b3ec-41a8-915d-1fe5fd3ed124",
  "errorList":
  [
    {"message":"Field \"password\" may not be empty", ... }, (2)
    {"message":"Field \"username\" may not be empty", ... },
    {"message":"\"meh\" is not a valid email address.", ... }
  ]
}| 1 | Set language to English |
| 2 | English validation messages in response |
Error Representation
All server side errors are returned as ApiError representations
An API error contains an error code, a unique error id which can be used by support staff to find the occurrence
of the error in the logs and a descriptive message.
API errors can occur for technical (like problems with the infrastructure) and business reasons (like invalid or incomplete
requests).
---
{
        "message": "The provided verification token is expired",
        "code": "ERR_REGISTRATION_VERIFICATION_EXPIRED_TOKEN",
        "errorId": "3aaabbb6-1529-42a3-9de2-bbc497a89d7a"
}
------
<ApiError>
<message>The provided verification token is expired</message>
<code>ERR_REGISTRATION_VERIFICATION_EXPIRED_TOKEN</code>
<errorId>c116a0ee-a873-4321-97ab-d2b89b12ec81</errorId>
</ApiError>
---For more details, like existing error codes or nesting of errors, see ApiError.
Pageable Objects
Services that return potentially long lists of items can be used with server side pagination of results. i.e.
the client does not request the complete list but rather a slice of it defined by an offset (the start of the
requested result relative to the full list) and a limit (the number of items to be returned).
The parameters are specified as query parameters in the URL.
Examples:
-
/api/v1/collections/{id4n}/elements?offset=10- retrieve all GUIDs from the 11th element to the end in collection with id{id4n} -
/api/v1/collections/{id4n}/elements?offset=10&limit=15- retrieve GUID 11 - 26 in collection with id{id4n} -
/api/v1/collections/{id4n}/elements?limit=20- retrieve GUID 0 - 19 in collection with id{id4n}
If you call a paginated resource without specifying offset and/or limit, the default values 0 for offset and
100 for limit are applied.
An example service that supports pagination can be found here: https://backend.id4i.de/docs/redoc/index.html#operation/listElementsOfCollection.
The response entities are wrapped into an object that states the given offset and limit parameters as well as
the total number of elements. The actual result list is contained in the elements property.
For examples see PaginatedResponseOfHistoryItem or PaginatedResponseOfGuid.
HTTP Status Codes
| Status | Meaning |
|---|---|
200 |
OK Standard response for successful HTTP requests. The actual response will depend on the request method used. In a GET request, the response will contain an entity corresponding to the requested resource. In a POST request, the response will contain an entity describing or containing the result of the action. |
201 |
Created The request has been fulfilled, resulting in the creation of a new resource. Typically, the location of the newly created resource can be found in the Location response header. |
400 |
Bad Request The server cannot or will not process the request due to an apparent client error. This typically happens if you send an invalid representation to the server. |
401 |
Unauthorized You may not access the requested resource. Similar to 403 Forbidden, but specifically for use when authentication is required and has failed or has not yet been provided. |
403 |
Forbidden The request was valid, but the server is refusing action. You do not have the necessary permissions to perform that action. |
404 |
Not Found The requested resource could not be found but may be available in the future. Subsequent requests by the client are permissible. |
405 |
Method not allowed A request method is not supported for the requested resource; for example, a GET request on a form that requires data to be presented via POST, or a PUT request on a read-only resource. |
406 |
Not Acceptable The requested resource is capable of generating only content not acceptable according to the Accept headers sent in the request. This happens if you request an unsupported media type or language from the server. |
409 |
Conflict Indicates that the request could not be processed because of conflict in the request, such as an edit conflict between multiple simultaneous updates. This happens if you update identifying fields to an existing value or try to create an entity twice with the same ID fields.. |
415 |
Unsupported Media Type The request entity has a media type which the server or resource does not support. For example, the client uploads an image as image/tiff, but the server requires that images use a different format, e.g. image/png |
500 |
Internal Server Error We screwed up. Please let us know so we can fix it and make it up to you.") |
Transfer
GUIDs and logistic collections can be transferred. Every transfer consists of two steps: The shipment preparation by the sender and the acquisition by the recipient
During preparation, the sender can define
-
the recipients, i.e. by whom the object can be acquired: either by anyone or by a specific set of organizations and
-
if he wants to keep the public ownership and just transfer the object to a new holder. See below and topic Private Labelling for more information on this flag.
Of course, preparation can also be revoked by the sender. Preparation data can be seen by other organizations depending on the recipients.
The acquisition by the recipient can either succeed, removing the visible preparation-data or fail if the actor is not the recipient (or can not act on behalf of the receiving organization).
Transferring collections
When a collection is transferred, all its items are transferred to the same new owner.
Accordingly, collections which have elements owned by foreign organizations can not be prepared for transfer. Although, if the privileges are set up accordingly, items from different owners can be transferred within a single collection. This can be used to implement partnerships between organizations or split up single departments of an organization as different sub-organizations.
Collections prepared for transfer can be compared to a closed package of items:
-
They are immutable: No items can be added or removed.
-
No item within the collection can be transferred on its own.
-
As long as a prepared collection has not been transferred, its content can stay prepared for transfer, too.
The last point may need some explanation using a small example. Assume a collection was prepared for transfer, although it unluckily contained an item prepared for transfer. Maybe one worker prepared the item for shipment by accident or maybe another worker put the item in the package by accident.
If the package is really send to the customer, the preparations of the item are revoked as soon as the collection is acquired by the receiver. The receiver now owns the item.
Instead, if (before shipment) the preparations of the collection are revoked by the sender, the item can be removed from the collection. The item’s shipment preparations are not lost and it can be shipped individually without further ado.
Holding back ownership
When a private labelling organization sends objects to the manufacturer for reprocessing (for example in a warranty case), the publicly seen ownership should remain at the private labelling organization. Please see section Private Labelling for motivation and further explanation of the differences between owner and holder.
Ownership can be held back by the sender for single GUIDs or whole collections. When the GUIDs or collections are transferred back to the private labelling organization, it needs to again set the hold-back-ownership flag. Otherwise, the transfer will be treated as a normal transfer (which is okay in most cases, as the object(s) will be sent not "back", but "forward" i.e. to a reseller or customer).
Collections
When holding back ownership of a collection, all it’s contained items' ownership is held back too.
When not holding back ownership of a collection while transferring it, ownership of it’s individual items is still being respected. That is, if a collection is transferred, including an item which was prepared for transfer and marked to hold back its ownership, the item’s public owner is unchanged - while only the holder changes. The collection itself and other items of the collection are of course unaffected by this item.
Holding back ownership is bound to the owner, not to the recipients. This means, that items of a collection which have the hold-back-ownership flag set but have a different set of recipients than the collection, keep their ownership when the collection is transferred. These items may have a completely disjoint or even empty set of recipients for the mechanism to work.
Multiple / Nested private labelling
Private labelling can technically be applied multiple times on a single product. ID4i supports these cases in a way which respects the private labelling most closely to the customer best.
Assume an item is sent from a producing organization A to a private labelling organization B and from there to a second private labelling organization C, which in turn sends it to a reseller.
-
The reseller has a warranty issue with a customer and sends the item to C to handle this.
-
Private labelling organization C sends the item to B and sets the hold-ownership-flag. When the item arrives at B, organization C is still the public owner, while B is the holder of the item. The customer thus only knows about the item being owned by C and seeing C’s public information about the item.
-
Private labelling organization B sends the item to A and sets the hold-ownership-flag. When the item arrives at A, organization C is still the public owner, while A is the holder of the item. The customer only knows about the item being owned by C, while C only also knows nothing about organization A holding the item.
-
Organization A repairs the item, or possibly sends it to another organization or department for repairs. This does not change any of the other participants belief about the item.
-
When the item is transferred back to B, public ownership is still at C.
-
When the item is transferred back to C, public ownership is actual holder C.
-
And when the item is sent back to the reseller, he may reacquire the ownership of the item as before the warranty issue.
Private Labelling
Private labelling is required in scenarios where the retailer or wholesaler (reseller) does not want to reveal the actual manufacturer identity to his customers. To achieve this, ID4i implements three main requirements.
-
ID4i does not encode the creator or owner of a GUID within that GUID. It also makes sure that the order in which the GUIDs where created cannot be seen from the GUID itself. This makes sure that GUIDs cannot be correlated to find out creation dates, lots or charges.
-
Any information from other organizations can be hidden by the reseller. The information is still accessible by the orignating company and the reseller itself, but no to any customers or subsequent resellers.
-
When an item is returned to the seller and reprocessed or fixed by the manufacturer or another partner, the public profile of the item remains the same, while the manufacturer is granted all the neccessary access rights to add or modify data of the item.
This has implications on visibility of data, documents and tracking history of privately labelled GUIDs. Also, the ownership must be derivable from the item’s GUIDs.
Regarding the item permissions, ID4i distinguishes between the owner and the holder of the GUID. Public visibility (i.e. for the
customer) is defined by the owner. This includes WhoIs, public Routing, Storage and History.
The permissions to modify the item (including attaching documents and data, defining routes and transferring the item
to other Organizations) are determined based on the holder.
Per default, the holder equals the owner and both are equally changed on each transfer of a GUID.
In private labelling scenarios, an owner can decide to keep the ownership and only transfer the GUID to a new holder.
For details, have a look at the API documentation at https://backend.id4i.de/docs/redoc/index.html#operation/setGuid.
In most cases, if an item is sold from manufacturers to resellers, the ownership changes.
If an item is reprocessed by a partner organization, the ownership is kept by the organization holding the private label,
while only the holder is changed to the organization reprocessing the item.
ID4i allows for multiple (nested) private labelling steps. In these scenarios, the holders can pass along the items,
while the owner remains at the outermost reseller, thus determining what information can be seen in public.
Holders can change internally visible data and maintain their perspective on what should or could become public data.
Data, which they mark as public is shared with the reseller, but the public public profile of the items
are controlled by the owner.
Client Libraries
To help you with building your application, we provide several client libraries to get you started. These client libraries are generated from the formal API description using Swagger Codegen. You are free to generate your own clients using customized templates in the same manner.
The source code of the provided client libraries along with further documentation and code samples is available at https://github.com/BlueRainSoftware.
Javascript
The Javascript API client can be found here: https://github.com/BlueRainSoftware/id4i-api_client-javascript
You can install the library in your npm based project via npm install BlueRainSoftware/id4i-api_client-javascript --save.
For installation instructions with bower and webpack please refer to https://github.com/BlueRainSoftware/id4i-api_client-javascript directly.
To login and call the api/v1/info endpoint, you can use the following code (provided you followed)
the installation instructions.
var Id4iApi = require('id4i_api'); (1)

var defaultClient = Id4iApi.ApiClient.instance;

defaultClient.defaultHeaders = { (2)
  'X-ID4i-Client': 'My ID4i client',
  'Accept-Language': 'de',
  'Accept': 'application/json;charset=UTF-8'
}


var accountsApi = new Id4iApi.AccountsApi(); (3)

var accountCredentials = new Id4iApi.AccountCredentials(); (4)
accountCredentials.login = 'My Username' (4)
accountCredentials.password = 'My Password' (4)

var callback = function(error, data, response) {
  if (error) {
    console.error(error);
  } else {
    console.log('Logged in');
    var Authorization = defaultClient.authentications['Authorization']; (5)
    Authorization.apiKey = token;
  }
};
accountsApi.login(accountCredentials, callback); (6)

var metadataApi = new Id4iApi.MetaInformationApi();
var callback = function(error, data, response) {
  if (error) {
    console.error(error);
  } else {
    console.log('API called successfully. Returned data: ' + data);
  }
};
metadataApi.applicationInfo(callback); (7)| 1 | Import the client library and create the operations |
| 2 | Set default headers to include with every request |
| 3 | Create the operation object |
| 4 | Create an prepare the resource to send (parameter object) |
| 5 | Set the returned token as header for the following requests |
| 6 | Perform the login operation |
| 7 | Call the API info endpoint |
| When doing so, you will use your user context to access ID4i. Typically, you will use API Keys and generate tokens for them instead |
| The ID4i web interface is based on exactly this client library. |
PHP
The Javascript API client can be found here: https://github.com/BlueRainSoftware/id4i-api_client-php/tree/master/SwaggerClient-php
You can either install the dependency using Composer (https://getcomposer.org/) or manually
<?php
require_once(__DIR__ . '/vendor/autoload.php');

$config = Swagger\Client\Configuration::getDefaultConfiguration()->setApiKey('Authorization', 'YOUR JWT or Authorization Token');

$apiInstance = new Swagger\Client\Api\MetaInformationApi(
    // If you want use custom http client, pass your client which implements `GuzzleHttp\ClientInterface`.
    // This is optional, `GuzzleHttp\Client` will be used as default.
    new GuzzleHttp\Client(),
    $config
);

try {
    $result = $apiInstance->applicationInfo();
    print_r($result);
} catch (Exception $e) {
    echo 'Exception when calling MetaInformationApi->applicationInfo: ', $e->getMessage(), PHP_EOL;
}
?>| Currently, the PHP client is not officially supported and prone to change in the future. You can use it at your own risk. Please let us know if you need a supported version. |
Typescript
The Typescript API client can be found here: https://github.com/BlueRainSoftware/id4i-api_client-typescript/tree/master
| Currently, the typescript client is not officially supported and prone to change in the future. You can use it at your own risk. Please let us know if you need a supported version. |
Java
The Java API client can be found here: https://github.com/BlueRainSoftware/id4i-api_client-java/tree/master.
You can find tutorials for building Java clients in Tutorials, especially in How to implement your first API client in Java. Sample code is published on GitHub: https://github.com/BlueRainSoftware/id4i-api_client-sample-java.
The library is also published to maven central for easy consumption: http://search.maven.org/#search%7Cga%7C1%7Cde.id4i You can use it in your projects by simply adding the dependencies to your build scripts.
<dependency>
    <groupId>de.id4i.api</groupId>
    <artifactId>id4i-api-client</artifactId>
    <version>0.9.5</version>
</dependency><dependency org="de.id4i.api" name="id4i-api-client" rev="0.9.5" />@Grapes(
@Grab(group='de.id4i.api', module='id4i-api-client', version='0.9.5')
)compile 'de.id4i.api:id4i-api-client:0.9.5'C# .Net
The C# API client library is available from NuGet at https://www.nuget.org/packages/BlueRain.ID4i/. Sources can be found here: https://github.com/BlueRainSoftware/id4i-api_client-csharp
You can add it to an existing .NET project by saying dotnet add package BlueRain.ID4i --version 0.9.5
The target platform is .NET Standard 1.3. For details about the requirements see the NuGet page.
Recommended Third-Party Tools
In this section we outline some of the tools we find helpful for developing API clients for ID4i and give some tips on their usage.
HTTP Clients
Postman is an API development platform. However, it is also great for simply playing around with an HTTP API and debugging requests.
Postman can import curl command lines (see How to troubleshoot failing API calls) and also Swagger/Open API specs.
To get a basic boilerplate for all requests into Postman, you can download our swagger specification from https://backend.id4i.de/swagger.json and
import it using Import → Import File → <swagger.json location>
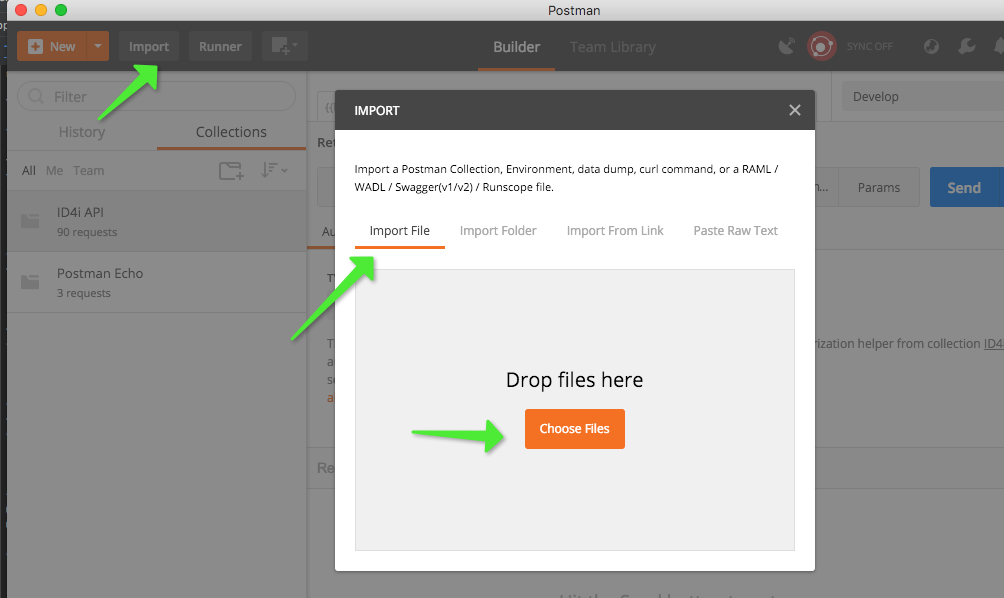
You’ll get a collection of templates for all ID4i requests as shown below.
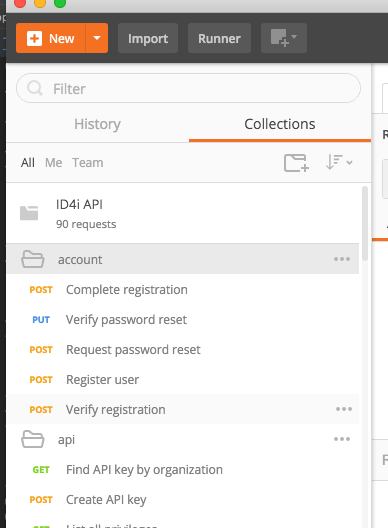
To be able to switch between sandbox and production environments, we suggest you create an environment for each of these systems
containing a baseurl variable with the value https://backend.id4i.de or https://sandbox.id4i.de. That way, you can update the
request`s URLs to {{baseurl}}/api/whatever/it/was and switch systems using the environment combo box in the upper right corner.
For not to have to copy an authorization token back an forth you can either …
-
… create an API token and put it into a variable or …
-
… login as your user, save the result from the
Authorizationheader into a variable and use this in subsequent requests
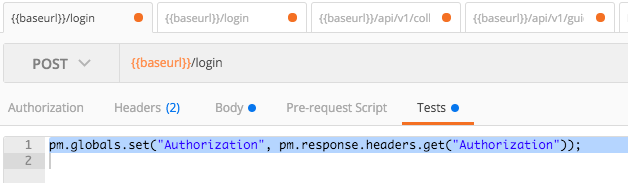
To use a variable in the header, add a header called Authorization with the value {{Authorization}} in the request.
To save the token returned from login into that variable, use a test with the script pm.globals.set("Authorization", pm.response.headers.get("Authorization")); in the /login request.

You can download Postman at https://www.getpostman.com/postman. There are collaboration tools on top of postman available for a monthly fee. However the basic app to talk to an HTTP API is completely free (but free as in beer, not free as in speech).
Insomnia: If you are uncomfortable with using non-open source software, have a look at https://insomnia.rest/ or https://github.com/getinsomnia/insomnia. Unfortunately, there is no swagger import for insomnia available, currently. But it seems that there is one on the way.
HTTPie: If you are more of a shell person, we recommend looking into HTTPie. HTTP is a modern, open source command line HTTP client. Think curl, but in actually intuitive. See https://httpie.org/.
jq
jq is a command line JSON parser which is very useful for shell-scripting small tasks, esp. in
combination with HTTPie. Think sed for JSON.
E.g., if you wanted to extract all URLs from our swagger specification, you could say cat swagger.json | jq .paths | jq keys | sort
to get something like the following.
"/account/password",
"/account/registration",
"/account/verification",
"/api/v1/apikeys",
"/api/v1/apikeys/privileges",
"/api/v1/apikeys/{key}",
"/api/v1/apikeys/{key}/privileges",
"/api/v1/apikeys/{key}/privileges/{privilege}/id4ns",
"/api/v1/billing/{organizationId}",
"/api/v1/billing/{organizationId}/positions",
"/api/v1/changelog/organization/{organizationId}/",
"/api/v1/collections",
"/api/v1/collections/{id4n}",
"/api/v1/collections/{id4n}/elements",
 ...
Get it at https://stedolan.github.io/jq/.
Swagger Codegen
We generate our client libraries with Swagger Codegen in our build
using the standard templates with minor modifications.
If our client libraries doesn’t include the
language/framework combination of your choice, feel free to generate your
own library from our swagger specification. We found that the swagger-codegen-maven-plugin
was quite pleasant to use (as far as you can say this WRT maven plugins …).
Tutorials
This section provides some in depth tutorials for ID4i client applciation development topics. Work through these tutorials to get familiar with the ID4i API and concepts. Even if the tutorial is in a different programming language as the client you are planning to implement, the API of the client libraries is the same across all supported languages, so you’ll learn the concepts anyway.
When implementing tutorials, we suggest you don’t connect to the production system but to the sandbox system. This system can be used free of charge, but all data will be wiped once a month.
The entry point to the sandbox system is https://sandbox.id4i.de. The API documentation is located at https://sandbox.id4i.de/docs/redoc/index.html, this developer manual at https://sandbox.id4i.de/docs/reference/en/reference.html.
How to implement your first API client in Java
This tutorial gets you started with writing an ID4i API client using Java.
You need a working JDK 1.8 and have Maven >= 3.5.0 installed to be able to follow along.
The complete source code of the example is on GitHub: https://github.com/BlueRainSoftware/id4i-api_client-sample-java
Preparation
To be able to connect to ID4i with an API client, you need to register and set up an API key for
your application first. Using this key, you can sign JWTs to send as Authorization header for
subsequent requests.
-
If you do not already have an ID4i account, please register at https://sandbox.id4i.de and log in.
-
Navigate to
API Keysand selectNew API Key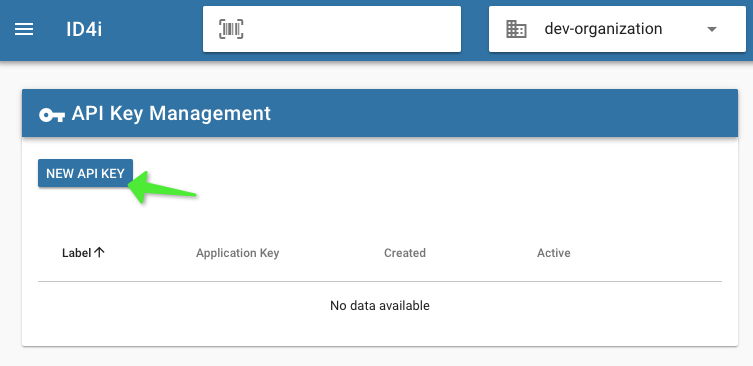 Figure 5. API key creation: new key
 -
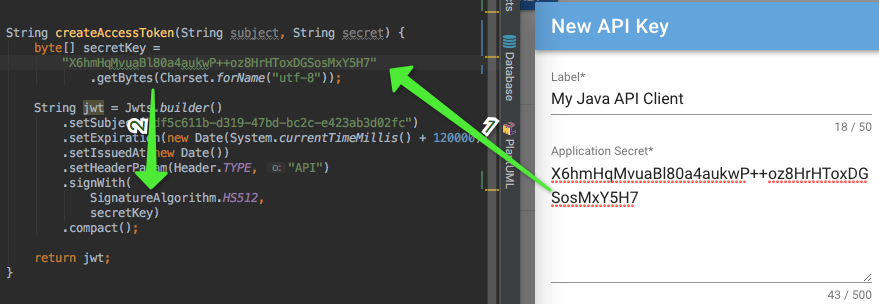
Give your key a label and enter an application secret (or let the application generate one for you). When using asymmetric signing, you would use your public key here.
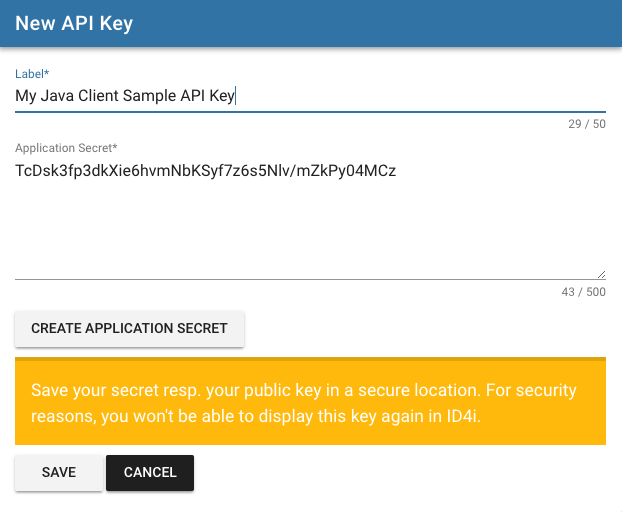 Figure 6. API key creation: set label and secret
 -
Save your secret resp. your public key in a secure location. For security reasons, you won’t be able to display this key again in ID4i.
-
Activate the key on the details page
 Figure 7. API key creation: activate key
| Do not store your API Keys and Secrets with the source code of your application. Either supply the key as a configuration property of your application or retrieve it from your own server when required in the application. Use a separate API Key for each deployment of your application. |
Project set up
To get started with a new project, you can have Maven generate a simple Java project for you using mvn archetype:generate.
If you prefer, you can also use your IDE for that, obviously.
In the following example, replace artifactId and groupId with your own values.
mvn archetype:generate \
  -DgroupId=de.id4i.samples \
  -DartifactId=id4i-api-client-sample-java \
  -DarchetypeArtifactId=maven-archetype-quickstart \
  -DinteractiveMode=false
Maven will create an empty project that already compiles and runs unit tests. Run mvn install to make sure everything went well.
Maven should report [INFO] BUILD SUCCESS.
Now we need to add two dependencies: One for working with JWTs and one for working with the ID4i API. While you could simply call all HTTP services using a plain HTTP client library, it may be simpler to use our pre-generated client. However, you are not forced to do so. You can also generate an own client using the OpenAPI specification at https://sandbox.id4i.de/docs/redoc/index.html.
To add these dependencies, add the following to the <dependencies> section of pom.xml:
    <dependency>
      <groupId>de.id4i.api</groupId>
      <artifactId>id4i-api-client</artifactId>
      <version>0.9.5</version>
    </dependency>
    <dependency>
      <groupId>io.jsonwebtoken</groupId>
      <artifactId>jjwt</artifactId>
      <version>0.9.0</version>
    </dependency>
If you want to use a -SNAPSHOT version to play with the development system, please talk to us. We can set you up to be able to do so.
If you run mvn install again now, you should see the artifacts being downloaded, e.g. like this: Downloaded: https://repo.maven.apache.org/maven2/de/id4i/api/id4i-api-client/0.1.1/id4i-api-client-0.1.1.jar
Once this completes, you can use the ID4i java client library in your application.
The example code on GitHub also creates an executable jar containing all dependencies using the maven-assembly-plugin for easy distribution and deployment.
Implement an application entry point
In this tutorial, we build a simple standalone application. Go to src/main/java/<package>/App.java, create a start(String[] args) method and call it from main().
public class App
{
   public static void main( String[] args )
    {
        App app = new App();
        app.start(args);
    }

    private void start( String[] args ) {
        System.out.println( "Hello ID4i" );
    }
}
Creating an authentication token
Now that we have the infrastructure in place, we can create a JWT to send along with our requests as shown in JWT token creation using JJWT.
To make ID4i recognize the key, you need to set the subject to your application key and sign with the secret you saved in the preparation step.
For details on the other parameters see JWT token creation using JJWT.
For the sake of this tutorial, we simply create one token and save it in a member of the application class. We create a token that is
valid until two minutes in the future.
| In your actual application, you’ll want to chose short validity times and recreate the token often as shorter token validity times are inherently more secure. If an attacker manages to steal your token, he can make requests against the API on behalf of your application until the the token times out or the API key privileges are revoked or the API key is deactivated. The maximum validity your application is allowed to give to a key is 30 minutes. Typically, half a minute is more than sufficient for most requests. |
After creation, we simply print it to stdout to see that something happened. In the source code on GitHub, you can also find
a corresponding unit test.
Run the application and it should print out something like Created access token eyJ0eXAiOiJBUEkiLCJhbGciOiJIUzUxMiJ9.eyJzdWIiOiJlOTRiMDA2LWQxZD…
private String jwt;

private String createAccessToken() {
    byte[] secretKey = "my secret secret 09345".getBytes(Charset.forName("UTF-8"));
    String jwt = Jwts.builder()
        .setSubject("e94b006-d1d9-11e7-8941-cec278b6b50a")
        .setExpiration(new Date(System.currentTimeMillis() + 120000))
        .setIssuedAt(new Date())
        .setHeaderParam(Header.TYPE, "API")
        .signWith(SignatureAlgorithm.HS512, secretKey)
        .compact();

    return jwt;
}

private void start() {
    jwt = createAccessToken();
    System.out.println( "Created access token " + jwt );
}
| As stated multiple times, you should NEVER put your API key secret into the source code. This is both for security reasons (an attacker could use a stolen secret to access the API using your account as long as you don’t deactivate the key) and for operations concerns (you will use different keys for different deployments of your app even if it’s only test and production). |
So, typically, you will provide the key as well as the secret via commandline arguments, configuration or environment variables. We use environment variables since they play together nicely with containerized deployments and can be supplied from a different (secured) source than the source code.
Let’s factor out the two parameters and get them using environment variables:
private static final String ENV_API_KEY = "ID4I_API_KEY"; (1)
private static final String ENV_API_KEY_SECRET = "ID4I_API_KEY_SECRET";

private String createAccessToken() {
    String subject = System.getenv(ENV_API_KEY); (2)
    String secret = System.getenv(ENV_API_KEY_SECRET);

    if (subject == null || secret == null) { (3)
        throw new IllegalStateException(
            "Could not find API key and secret to create JWT. Are the environment variables "
                + ENV_API_KEY + " and "
                + ENV_API_KEY_SECRET + " set?");
    }
    byte[] secretKey = secret.getBytes(Charset.forName("UTF-8"));
    String jwt = Jwts.builder()
        .setSubject(subject) (4)
        .setExpiration(new Date(System.currentTimeMillis() + 120000))
        .setIssuedAt(new Date())
        .setHeaderParam(Header.TYPE, "API")
        .signWith(
            SignatureAlgorithm.HS512,
            secretKey) (4)
        .compact();

    return jwt;
}| 1 | define environment variables names |
| 2 | retrieve the corresponding values |
| 3 | make sure the values are set |
| 4 | use the values from the environment to construct and sign the JWT |
Making your first API call
For our first call, we’ll use GET /api/v1/info which returns some information about the version of the application currently running.
To construct our call, we need to
-
Create an API instance
-
Set our common headers
Accept-languageandAuthorization
To set the authorization, we use the JWT created before: String authorization = "Bearer " + jwt; Note the Bearer prefix as defined in RFC 6750.
For the language, en and de are supported, defaulting to en.
MetaInformationApi apiInstance = new MetaInformationApi();

ApiClient defaultClient = Configuration.getDefaultApiClient();
defaultClient.setUserAgent("id4i-client-sample"); (1)

ApiKeyAuth authorization = (ApiKeyAuth) defaultClient.getAuthentication("Authorization"); (2)
authorization.setApiKey(jwt);
authorization.setApiKeyPrefix("Bearer");

defaultClient.addDefaultHeader("Accept-Language", "en"); (3)
defaultClient.setBasePath("https://sandbox.id4i.de/"); (4)


try {
    ApiResponse<AppInfoPresentation> result = apiInstance.applicationInfoWithHttpInfo(); (5)
    System.out.println(result.getData());
} catch (ApiException e) { (6)
    e.printStackTrace();
}| 1 | Set a user agent that represents your application |
| 2 | Initialize the api client with the token we created before. Subsequent calls use this token. Make sure to refresh it in short intervals. |
| 3 | Set the default language for our client |
| 4 | Set the base path to our sandbox system. Otherwise, your client will connect to the production instance on https://backend.id4i.de |
| 5 | We receive an object that has already been de-serialized from the JSON representation |
| 6 | If something goes wrong, an ApiException is thrown |
Congratulations! You just made your first API call! How awesome is that? And if something did not work out as expected, don’t worry, you can first look into How to troubleshoot failing API calls and/or contact us. We’re real humans and happy to help. See Getting Support for ways to reach out.
| All available API calls are documented with code samples on GitHub: https://github.com/BlueRainSoftware/id4i-api_client-java/. |
ApiExceptions contain ApiError representations. As opposed to business types, these are not deserizalized automatically, so you need to
do something like ApiError apiError = new Gson().fromJson(e.getResponseBody(),ApiError.class);
|
For longer running calls, you will probably want to use an asynchronous variant. Luckily, you can. For each operation there is an async
version, eg. applicationInfoAsync for applicationInfo that uses the OKHttp Call in which you
can register a Callback function. For details, see https://github.com/square/okhttp/wiki/Recipes#asynchronous-get and the example
on GitHub.
|
| Keep in mind that even though talking to the API feels like you are making local calls, what actually happens in the background is network communication over HTTP. |
You are now ready to explore the available operations either based on the HTTP interface directly (see https://sandbox.id4i.de/docs/redoc/index.html) or by using the API client libraries' docs at https://github.com/BlueRainSoftware/id4i-api_client-java.
Before jumping into a more complete use case, let’s review what happened in the background when we called apiInstance.applicationInfo() and how we can influence that:
-
The default API client was retrieved. You can look into
de.id4i.ApiClientto review the defaults. You can also construct your own instance and set it to the API instance before making a call like thisapiInstance.setApiClient(myCustomApiClient);, see [java-custom-api-client]. In a real world scenario, you would set at least the user agent. You should use one client per thread in a multi threaded scenario. -
The target URI of the operation was determined and an HTTP call to it was prepared
-
AuthorizationandAccept-languageheaders were set onto that call based on the default api client instance -
Content type is negotiated
-
If there is a request body it is serialized
-
The request is sent, the response is …
-
… received,
-
… de-serialized and
-
… returned.
How to work with GUIDs and Collections using the Java API - 1/2 Producer
This tutorial will show you how to create GUIDs, put them into a collection and transfer them to another organization.
| You should have completed the first tutorial and know how to create a API key and corresponding JWT and make an API call using a client library or plain HTTP before proceeding with this tutorial. |
Let’s assume an organization producing tools (Producer with ID4i client P) is providing these to a
reseller (Reseller with ID4i client R) who puts them onto his web shop and wants to provide additional information to
customers about the tools there later [1].
Modelled in ID4i, this would involve two applications - one for each organization - exchanging GUIDs along with corresponding meta data.
Here is what we want to happen between those two parties:
-
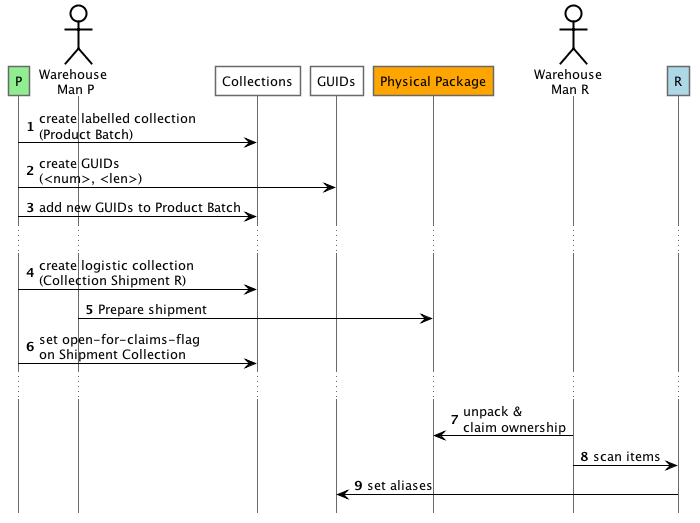
Pcreates a list of GUIDs and puts the corresponding data matrix codes onto a batch of produced tools. Typically, this would happen as part of the manufacturing process: Whenever one workpiece is ready to be labelled, a GUID is requested from ID4i and put onto the workpiece. To keep track of the GUIDs,Pcreates a labelled collection (see Collections). -
Later,
Pprepares a shipment toR. To to so,Pcreated a logistic collection containing all IDs of products to transfer toR. -
When physically shipping the goods,
Pmarks them as claimable by the next party who unwraps the package and scans the GUID codes -
Rreceives the package, scans the contained items and claims ownership -
Rassigns an internal and a global product number to each GUID -
Later,
Rsets up Routing in ID4i to redirect users who scan the product to the technical information section of the product in their web shop (where the user can conveniently order matching additional items…)
This is but a trivial example on how to exchange data on ID4i. In reality, the more organizations participate in a process, the more benefit is generated: data about products is incrementally augmented along the value stream from pre-production over maintenance to recycling, manufacturers gain insight about the usage of their products (which helps in maintenance and for product enhancement) and users verify their products' origin.
Preparation
In addition to the Api Key (see API Keys) you created in the last tutorial, you will work with several ID4i items using the web interface; Collections, Organizations and Routing files.
Before starting with the tutorial, we’ll create a labelled collection to hold our batch of produced things and an organization we send our goods (along with the GUIDs) to. In reality, this organization would already exist in ID4i. For the sake of the tutorial, we create one of our own. You are free to reuse your default organization from the last tutorial in this one or to create a new one and a new API Key now.
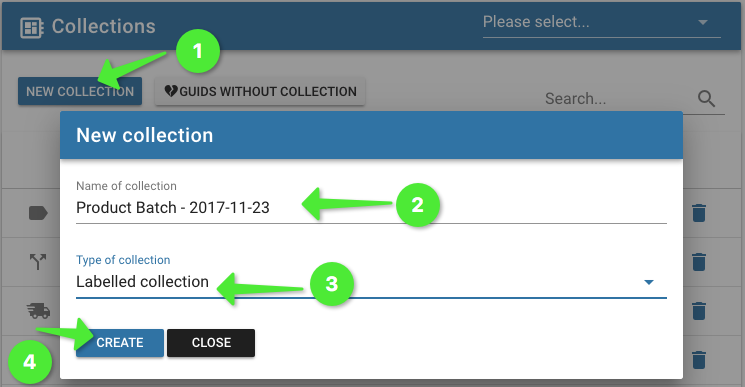
First, (Step 1 in the sequence diagram above) we create the labelled collection called
Product Batch using Menu → Collections → New Collection (Product Batch, Labelled Collection).
Then, we create an organization to act as reseller: Menu → Organizations → New Organization (Reseller).
We will create the rest of the required data as we go along in the tutorial.
After that, we set up a new project as we did in the first tutorial. But instead of putting our business
logic simply in main, we create two application classes to separate Producer and Reseller as shown below.
Each of these classes are set up like the main class in the previous tutorial.
You can find the finished source code of this tutorial at GitHub. You’ll note that we factored out some of the basics we learned in the first tutorial into reusable utilities.
public class ProducerApp {
    private final ApiClient producerApiClient = new ApiClient();
    private final GuidsApi guidsApi;

    public ProducerApp() {
       // retrieving API Key & Secret
       // using enviroment variables omitted here
       ...

       producerApiClient.setUserAgent("id4i-sample-guids-producer"); (1)

       String jwt = Jwts.builder() (2)
            ... // details ommitted, see previous tutorial
            .compact();
       ApiKeyAuth authorization =
            (ApiKeyAuth) producerApiClient.getAuthentication("Authorization");
       authorization.setApiKey(jwt);
       authorization.setApiKeyPrefix("Bearer");

       guidsApi = new GuidsApi();
       guidsApi.setApiClient(producerApiClient); (3)

       ...
    }

    public void doThingsWithId4i() throws ApiException { ... }
}| 1 | Create separate api client for the reseller app |
| 2 | Create and sign token, see API Keys and How to implement your first API client in Java for details |
| 3 | Use the api client for subsequent calls |
public class GuidTutorial {
public static void main(String[] args) {
ProducerApp producerApp = new ProducerApp();
ResellerApp resellerApp = new ResellerApp();
try {
// perform business logic here as shown in the
// sequence diagram above
producerApp.createGuids(); (2)
...
...
resellerApp.setAliases(); (10)
} catch (ApiException e) {
ApiError apiError = deserialize(e);
System.err.println(apiError);
e.printStackTrace();
}
}
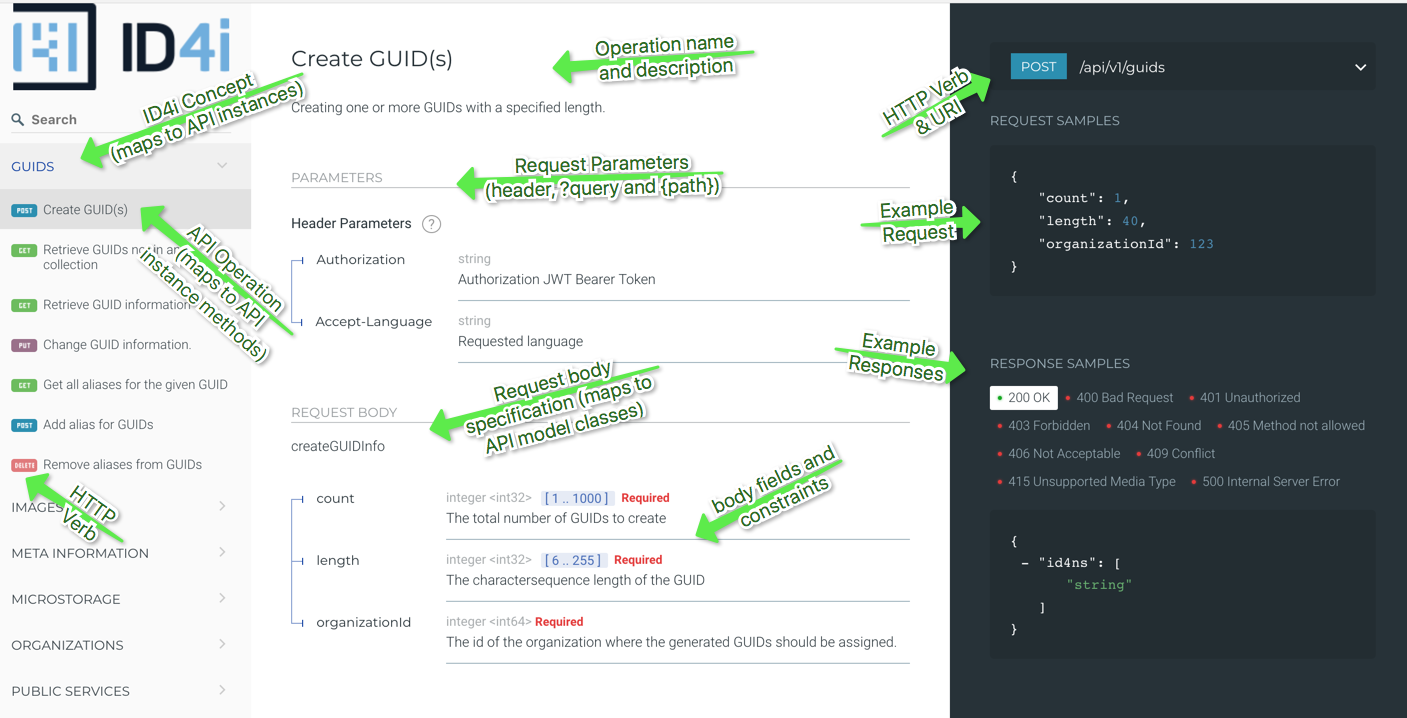
}Create GUIDs (2) - and learn about things that can go wrong
The first thing we need to do is to create some GUIDs to work with. To find out how to create them,
let’s have a look into to API documentation at https://backend.id4i.de/docs/redoc/index.html. There, we can either navigate
using the items on the left or use the search.
The operation we are looking for is here: https://backend.id4i.de/docs/redoc/index.html#operation/createGuid. There, we can find
the HTTP resource, method, status codes and expected representations as shown below.
So we learned that we want to call POST …/api/v1/guids/ with a request body that contains some
information about the GUIDs to create.
Now we have all the information to make an API call manually (e.g. using curl or postman) or to
find corresponding calls in the client library:
-
ID4i Concept: GUID →
de.id4i.api.GuidsApi -
Operation: create GUIDs →
de.id4i.api.GuidsApi.createGuid(…) -
Request Model: CreateGuidRequest
de.id4i.api.model.CreateGuidRequest(operation parameter) -
Response Model: ListOfId4ns
de.id4i.api.model.ListOfId4ns(operation return type)
Let’s call this operation using the client library, run GuidTutorial and see what happens.
// in ProducerApp
public void createGuids() throws ApiException {
    CreateGuidRequest createGuidRequest = new CreateGuidRequest();
    ListOfId4ns createdGuids =
        guidsApi.createGuid(createGuidRequest);

    System.out.println(createdGuids);
}
It seems that this has not worked so far. Luckily, the ApiError tells us what happened. If you have set up your application as shown above, you should see something like the snippet below on your console. It contains an error code, a unique error id (which we, as the ID4i operations team can use to find the corresponding logs) and some additional messages.
class ApiError {
    code: ERR_INPUT_VALIDATION_FAILED (1)
    errorId: f13c37cb-bb16-45fe-86eb-952963721032 (2)
    errorList: [class ApiError { (3)
        code: ERR_FIELD_INPUT_VALIDATION_FAILED (4)
        errorId: null
        errorList: null
        message: Field "length" may not be empty (5)
    }, class ApiError {
        code: ERR_FIELD_INPUT_VALIDATION_FAILED
        errorId: null
        errorList: null
        message: Field "organizationId" may not be empty (5)
    }, class ApiError {
        code: ERR_FIELD_INPUT_VALIDATION_FAILED
        errorId: null
        errorList: null
        message: Field "count" may not be empty (5)
    }]
    message: Validation failed (5)
}
de.id4i.ApiException: Bad Request (6)
	at de.id4i.ApiClient.handleResponse(ApiClient.java:1073) (7)
	at de.id4i.ApiClient.execute(ApiClient.java:989)
	at de.id4i.api.GuidsApi.createGuidWithHttpInfo(GuidsApi.java:465)
	at de.id4i.api.GuidsApi.createGuid(GuidsApi.java:449)
	at de.id4i.samples.java.guids.ProducerApp.createGuids(ProducerApp.java:40)
at de.id4i.samples.java.guids.GuidTutorial.main(GuidTutorial.java:14)| 1 | Error code. If you can’t make sense of it, please include it in a support case. We can. |
| 2 | Error ID. Unique Id that helps us to find the log messages belonging to that error |
| 3 | An error can contain additional errors. This is useful for validations as in this case. Most other errors have no children. |
| 4 | Error code of a subordinate error |
| 5 | Error messages |
| 6 | HTTP Status (400 Bad Request in this case) |
| 7 | We let our simple error handling implementation for this tutorial print the stack trace. You will probably use a little more sophisticated logging and error handling. |
So what we learn from this error is, that the validation of our request body failed.
The fields length, count and organizationId may not be empty. If we would have read the API docs,
we would have known that. But hey, so we got a chance to have a look at an error. We will probably need
that at some point in time.
So we update our CreateGuidRequest to add the required information. We create 10 GUIDs of the length 128 characters for our reseller organization. The organization ID is the namespace you used when creating the organization. You can look it up again in the organization view. Make sure you use the organization id of the producer organization - it has to match the API key owner.
The updated call should look like the snippet below.
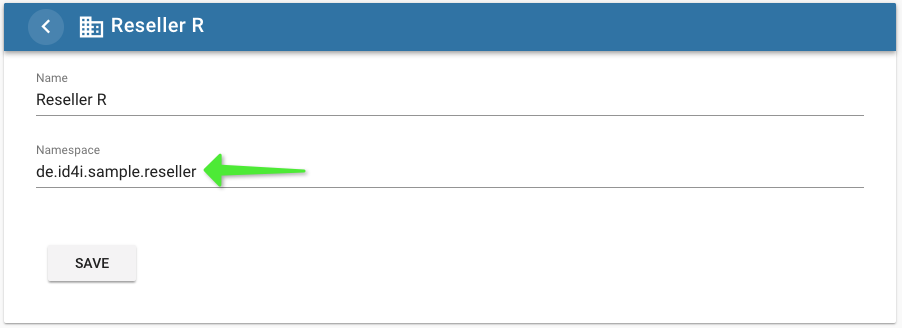
CreateGuidRequest createGuidRequest = new CreateGuidRequest();
createGuidRequest.setCount(10);
createGuidRequest.setLength(128);
createGuidRequest.setOrganizationId("de.id4i.sample.reseller");
ListOfId4ns createdGuids =
    guidsApi.createGuid(createGuidRequest);
Unfortunately, this still does not work. We get an ApiError telling us we are missing
the privilege to create GUIDs: ERR_AUTHORIZATION_MISSING_PRIVILEGES with the message Missing privileges: [CREATE_GUID].
So we need to find our API Key using the web interface and give it the corresponding permissions. Also make
sure the API key is activated. Note that creating GUIDs is an operation that incurs charges, so make sure to try this
on the sandbox first and make sure everything works as expected. Your application using a key with such a permission
has the permission to create costs for your organization.


Then retry the request. Finally, we have created our first GUIDs.
Before moving on, let’s recap what we learned to far:
-
We looked into a process spanning two organizations that communicate using ID4i
-
We created a collection and an organization using the UI
-
We used our skills from the previous tutorial to create an API Key, set up a Java project for our API client and make an API call.
-
We had a look into the API documentation to find out which operation we needed
-
We called that operation, interpreted and fixed the occurring failures
-
We gave additional privileges to an API key
Add GUIDs to collection (3)
The next task is to add the created GUIDs to the collection we created manually earlier. After what we’ve learned in the previous chapter, this should be a little easier now.
The operation we need is Collections - add elements to labelled collection.
For that, we will make our createGuids() method return the created GUIDs and put them into the collection.
We’ll wire it up in our base application class GuidTutorial.
// in GuidTutorial
public static void main(String[] args) {
    ProducerApp producerApp = new ProducerApp();
    ResellerApp resellerApp = new ResellerApp();

    try {
        ListOfId4ns guids = producerApp.createGuids(); // 2
        producerApp.putGuidsIntoCollection(guids,"zU71..snip..6qRDq"); // 3
    } catch (ApiException e) {
        ApiError apiError = deserialize(e);
        System.err.println(apiError);
        e.printStackTrace();
    }
}

// in ProducerApp
public void putGuidsIntoCollection(ListOfId4ns guids, String collectionId)
    throws ApiException {
    collectionsApi.addElementsToCollection(collectionId, guids);
    }
}
There is just one piece of the puzzle missing. We need to figure out the collection ID of the target
collection. We can do so using the web interface again. Either use the view or the
copy button beside the collection. Note that collections also use GUIDs as identification.
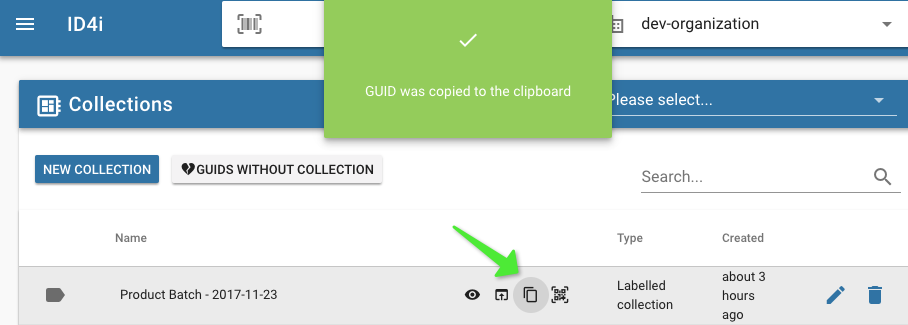
When running it, you will see that we need additional privileges again: [ADD_ELEMENTS_TO_LOGISTIC_COLLECTION, ADD_ELEMENTS_TO_COLLECTION].
So we need to head over to the API key management and add the permission ADD_ELEMENTS_TO_COLLECTIONS for our
Product Batch collection to our key. We actually need only this one permission for the API key as we select
the collection for which we add the permission explicitly.
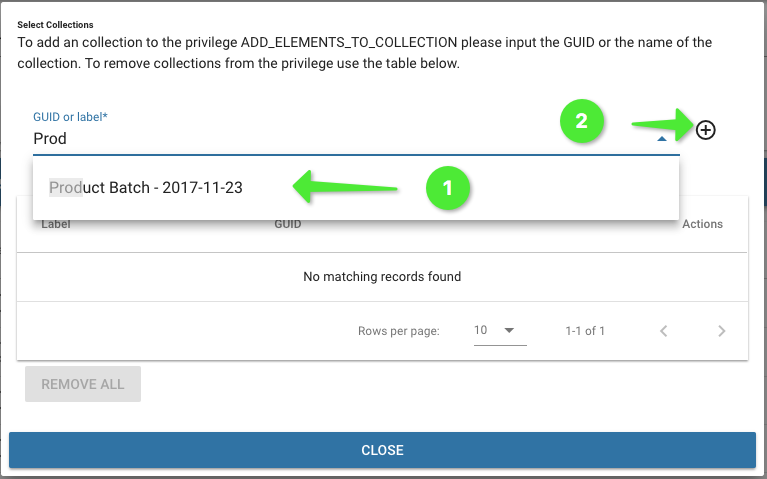
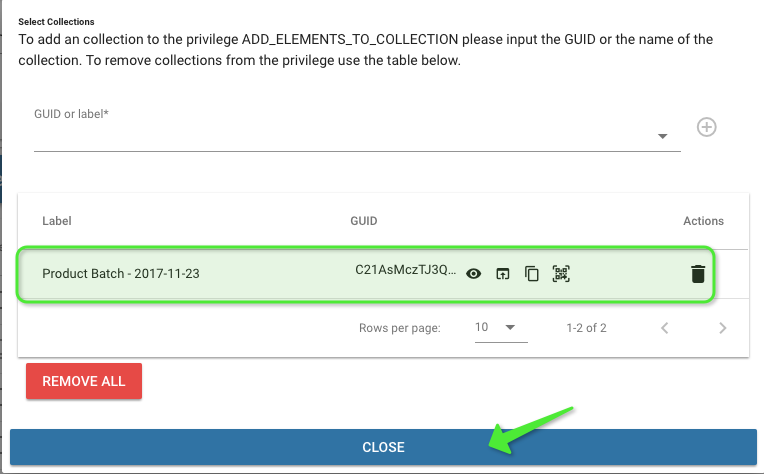
After having done so, run the application again. it should finish silently now. To see what happend open the collection in the UI and admire the beautiful GUIDs your API client created.
| Adding elements to a collection is an idempotent operation, meaning you can safely run it over and over again without changing the state, given you run it with the same parameters, obviously. |
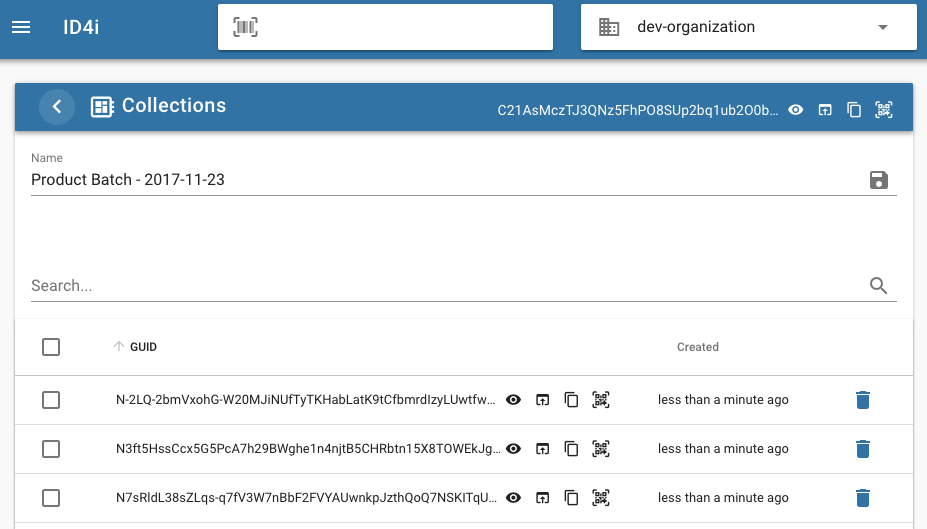
| As you saw when giving the permission to the key, this permission is specific to a list of collections. This can be used to model transfer of responsibility between different applications. |
In this chapter, we …
-
… took the GUIDs we created earlier to an existing collection
-
… gave our API key additional permissions for a specific collection
In the next step, we will create a logistic collection using the api client to prepare a shipment to our reseller.
Transferring ownership using logistic collections (4, 5, 6)
To be able to transfer the ownership of GUIDs to another organization, we can put them
into a logistic collection. Logistic collections model actual, physical shipments of goods.
You can think of a logistic collection of an inventory of a package. When sending this package
out, you will set a flag on the collection to allow it to be claimed by the receiving party.
Once the receiver (our Reseller) opens the package, he can access the IDs and set his own
organization as owner. Typically, this is done when putting the received items in stock
(by an API client attached to a scanner).
So, the first step is to create a logistic collection. You will figure out which operation to call, which permissions you need and how to get them.
public Id4n createLogisticCollection() throws ApiException {
    CreateCollectionRequest request = new CreateCollectionRequest();
    request.setLabel(
        "Shipment to Reseller - "
        + new SimpleDateFormat("yyyy-MM-dd HH:mm:ss")
            .format(new Date()));
    request.setType(CreateCollectionRequest.TypeEnum.LABELLED_COLLECTION);
    request.setOrganizationId(ORGANIZATION_ID);
    request.setLength(128);
    return collectionsApi.createCollection(request);
}
The result should look similar to this. If you look into the collection, you will see it is empty.
Also note that this operation creates a new collection for each run. So don’t get lost and clean up after yourself.
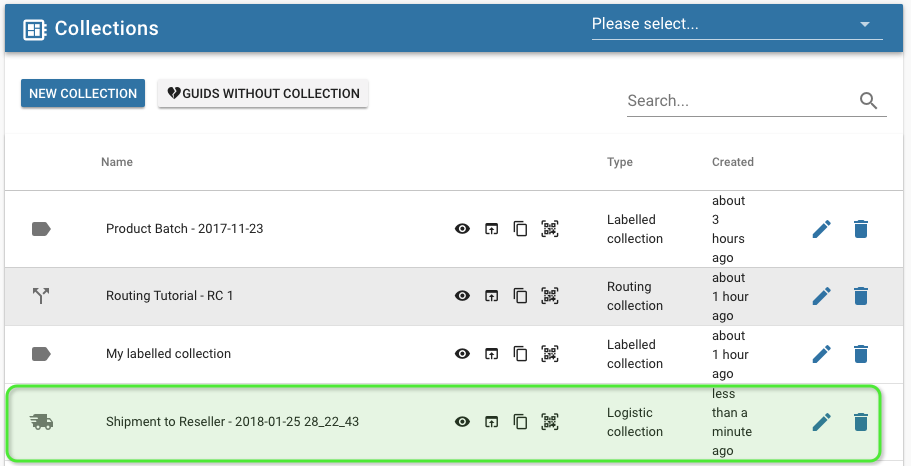
Noted the return type Id4n? While GUIDs are typically exchanged using
their String representation, there are other objects identified by such IDs.
If we talk about the ID that could identify any object like a GUID or a collection we use id4n.
Technically, a GUID is-a Id4n of the type GUID.
|
In the next step, we pick some of the IDs we created earlier and add them to the shipment collection. This could happen by someone in the warehouse scanning items he puts into a package. For simplicities sake, we just add all GUIDs we created before.
public void putGuidsIntoCollection(ListOfId4ns guids, String collectionId) throws ApiException {
    collectionsApi.addElementsToCollection(collectionId, guids);
}
Note that we did not specify a collection type (labelled, logistic, routing)
in our API operation. For collections, there are operations that check
the collection type, thus providing additional safety against errors.
However, since collections of all types also share a majority of their
capabilities, there is also a generic version for the common operations like
create, rename, add elements and delete.
After integrating the code in GuidTutorial (producerApp.putGuidsIntoCollection(guids, shipmentCollectionId.getId4n())), we can run it and see that our
GUIDs where put into our logistic collection.
Lastly, when we are ready to ship the package and make its contents
claimable by the receiving party, we prepare a transfer and set the open-for-claims flag.
This allows any organization to claim the GUID. It is typically used when moving an item internally within
organizations (departments, in this case) of the same company. To restrict which organizations may claim the item,
you have to set the recipientOrganizationIds field to a list of organizations that may receive the transfer.
If you set keepOwnership to true, the sending organization will keep the ownership; the receiver will be the holder
, not the owner after he claims the GUID. You would do this if you send an item to a contractor or partner to process the
without actually selling it. See Transfer for details.
 public void flagCollectionForTransfer(String collectionId) throws ApiException {
    TransferSendInfo tsi = new TransferSendInfo();
    tsi.setOpenForClaims(true);

    // Set open-for-claims or specify the list of allowed receivers as in the next line
    // tsi.setRecipientOrganizationIds(Arrays.asList("de.id4i.sample.reseller"));

    tsi.setKeepOwnership(false);

    transferApi.prepare(collectionId,tsi);
}
This concludes the Producer part of the process. We created the GUIDs, put them into a collection for our
internal management and created a second collection to hold the GUIDs. We are now about to ship to our Reseller and
allowed the next party to claim the items.
The complete flow is visible in GuidTutorial.
 public static void main(String[] args) {
    ProducerApp producerApp = new ProducerApp();
    ResellerApp resellerApp = new ResellerApp();

    try {
        ListOfId4ns guids = producerApp.createGuids();
        producerApp.putGuidsIntoLabelledCollection(guids,"puF...snip...QT");
        Id4n shipmentCollectionId = producerApp.createLogisticCollection();
        producerApp.putGuidsIntoCollection(guids, shipmentCollectionId.getId4n());
        producerApp.flagCollectionForTransfer(shipmentCollectionId.getId4n());
    } catch (ApiException e) {
        ApiError apiError = deserialize(e);
        System.err.println(apiError);
        e.printStackTrace();
    }
}
How to work with GUIDs and Collections using the Java API - 2/2 Reseller
To follow along with this part, the Reseller organization needs to be set up and have an active API key.
You will need to figure out which permissions the key needs, but you learned how to do that in the last
section.
Note that you can switch organizations using the combo box in the upper right corner of the web UI.
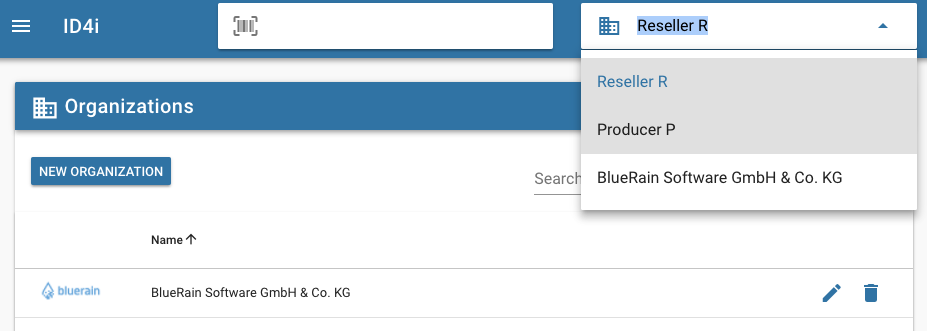
Claim ownership (7, 9)
Now we assume all the items corresponding to the GUIDs in the logistic collection have been sent to
the reseller. Upon receipt, the package is opened and all items are scanned. The Reseller application is
hooked up to the scanner and is responsible for taking the ownership of these items.
To take the ownership, the receiving party simply receives the GUID transfer to set her own organization id. This is only
possible if the sending organization made the GUIDs transferable by setting open-for-claims flag or included the
receiving organization in the recipient list.
The open-for-claims method
is suitable only if the items cannot be scanned by a third party on the way. This is the case if they are
packaged up and the codes only become visible on unpacking. If this is not the case, you need to transfer the
ownership directly by setting recipientOrganizationIds.
|
The code to claim ownership for one item could look like this.
public void takeOwnership(String guid) throws ApiException {
    refreshToken(resellerAppClient, subject, secret); (1)
    TransferReceiveInfo tri = new TransferReceiveInfo();
    tri.setHolderOrganizationId(organizationId); (2)
    transferApi.receive(guid, tri);

    GuidCollection guidCollectionRequest = new GuidCollection();
    guidCollectionRequest.setLabel("Incoming package - " + new SimpleDateFormat("yyyy-MM-dd HH:mm:ss").format(new Date()));
    collectionsApi.updateCollection(guid, guidCollectionRequest); (3)
}| 1 | Refresh the api client with a new JWT |
| 2 | Set our own organization Id (this is possible b/c of the open-for-claims flag). We retrieve the organization ID from an environment variable, as it would differ between test/production environments. We’ll move this into the classes' constructor later. |
| 3 | Set a label to the transferred collection |
Next, we want to add some additional means for identifying our GUIDs. We use Aliases to add an internal item number to some of the GUIDs and a GTIN to some others.
There are aliases that identify a single GUID (one workpiece) like item, mapp and rfid and
aliases that identify mutltiple workpieces of an article or product (gtin, article)
|
public void setAlias(String id4n, String aliasType, String alias) throws ApiException {
    refreshToken(resellerAppClient,subject, secret);

    GuidAlias aliasObject = new GuidAlias();
    aliasObject.setAlias(alias);
    guidsApi.addGuidAlias(id4n, aliasType, aliasObject);
}resellerApp.setAlias(guids.getId4ns().get(0), "gtin", "978-3200328587");
resellerApp.setAlias(guids.getId4ns().get(2), "gtin", "978-3200328587");
resellerApp.setAlias(guids.getId4ns().get(4), "gtin", "978-3200328587");
resellerApp.setAlias(guids.getId4ns().get(1), "article", "internal-article-id");
resellerApp.setAlias(guids.getId4ns().get(3), "article", "internal-article-id");
resellerApp.setAlias(guids.getId4ns().get(5), "article", "internal-article-id");After we call that new method in our Reseller app, we can search for the aliases using the
UI (or the search API operations).
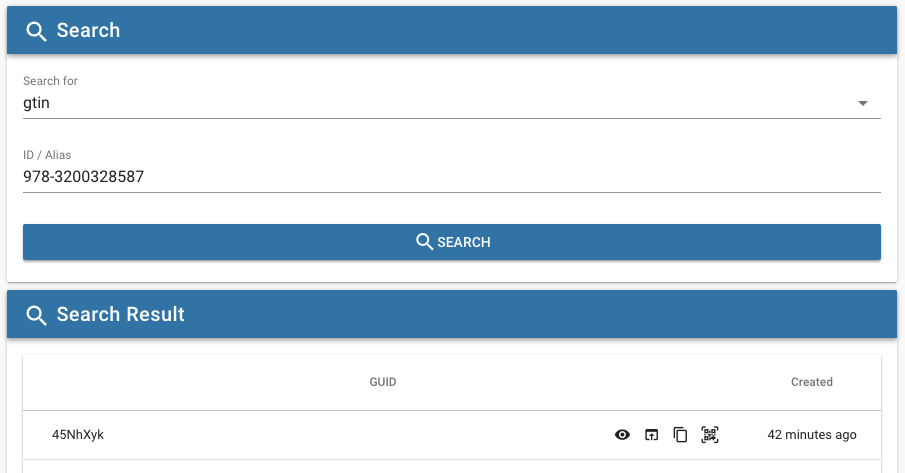
These aliases can be used later to set up routes to information about GUIDs hosted in external or third party systems, like a web shop, an internal ERP or PIM system, a manufacturing machine on the shop floor or a delivery tracking service, to name just a few. We’ll see how to set up Routing in the following tutorial.
Before we get to that, let’s recap what happened on the reseller side and what we implemented to support it:
-
We received a package and scanned the collection ID included in that package. An alternative would have been to scan all items contained in that package.
-
We claimed the ownership of the package’s contents (i.e., the ownership of the corresponding GUIDs) by setting our organization ID as owner. This was possible, because the previous owner, the
Producerallowed this by setting theopen-for-claimsflag. -
We then connected the items in the package using item IDs (or article numbers) of our own (as the
Reseller)
We learned how to set up processes spanning multiple organizations using ID4i as a central backend for single workpiece related information. The process we looked at was pretty simple, but the basic mechanics needed to implement large scale processes were covered.
How to set up routing for GUIDs
This tutorial walk will walk you through setting up Routing for GUIDs, using routes in public via /go/<guid>
and in your API client. If you haven’t done so, please read Routing to familiarize yourself with the provided features.
We assume that you already created an API key (see API Keys) and work in the content of the
Reseller organization from the previous tutorial.
Preparation
To get started, log in to ID4i, create a new routing collection, add some GUIDs and open the collection’s routing file. We’ll do this using the user interface. If you want to create Collections and add existing GUIDs - instead of adding new ones - using your own API client, have a look at the previous tutorial about working with GUIDs and Collections.
-
Make sure you selected an organization you created an API key for previously, e.g. the
Resellerfrom the last tutorial. -
Create a routing collection:
Collections → New Collection → <name>, Routing Collection → Create -
Create GUIDs:
Create new GUIDs → select <length>, <count>, <labelled and routing collection> → Create GUIDs -
Open previously created routing collection:
Collections → <name> → Edit -
Open routing file:
Edit Routing File
You will now see an editor with an empty routing file.
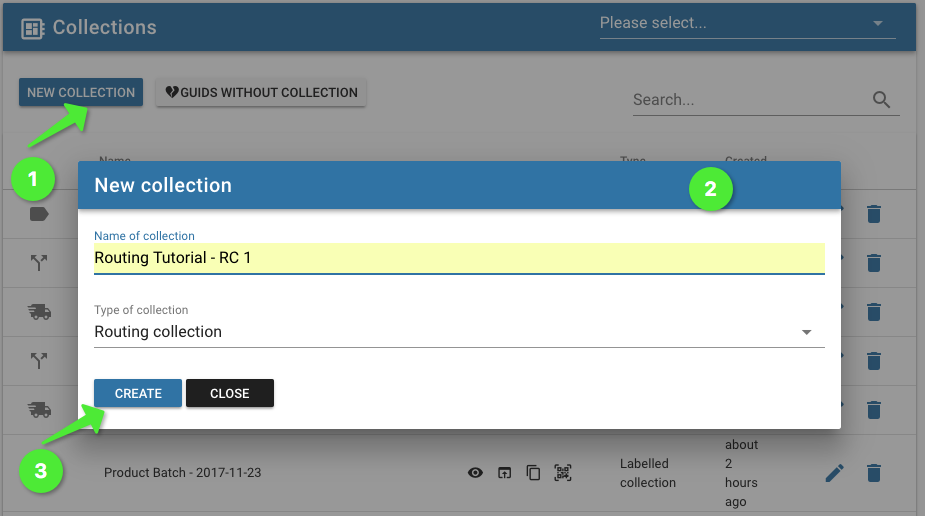
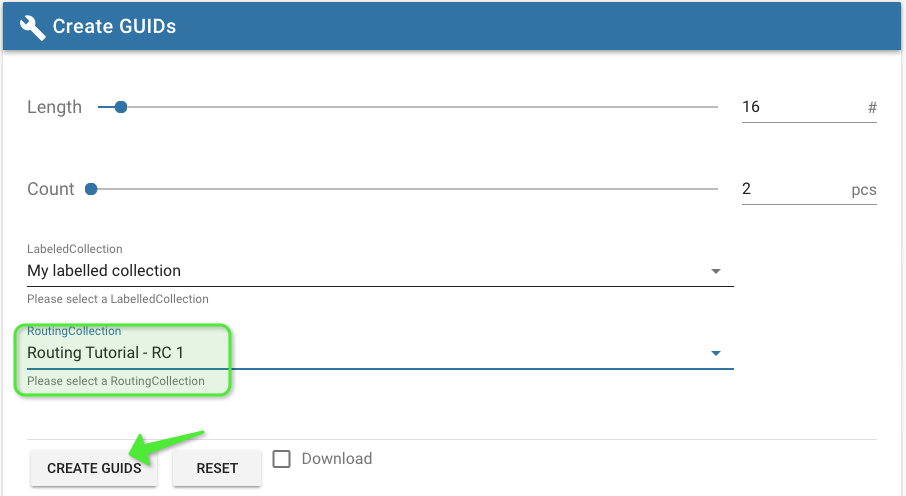
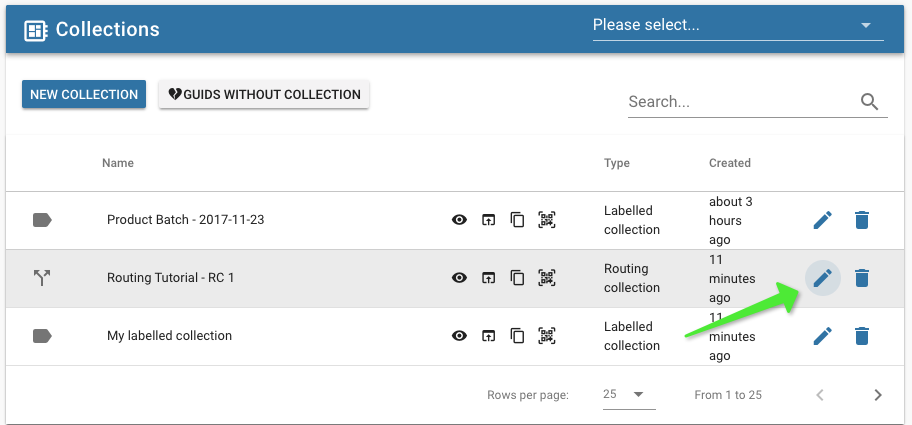
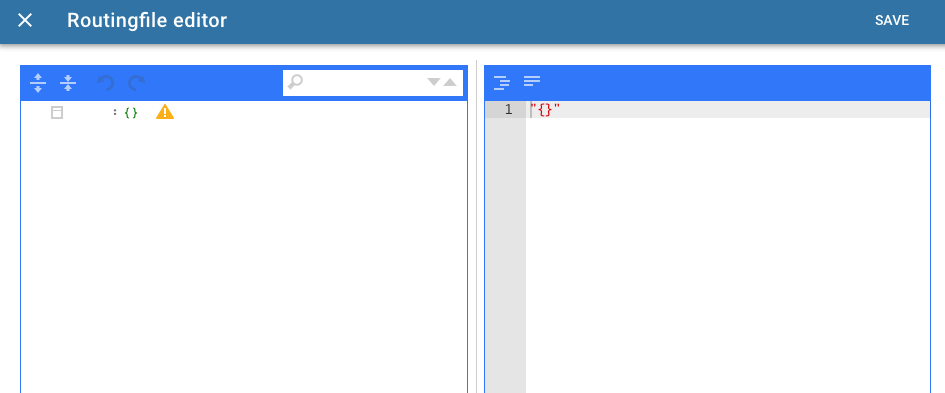
Set up a public route using the web interface
We will create the first route using the editor in the UI. Alternatively, we can construct a routing file using the API client library or simply write it as JSON in an editor of your choice and upload it using https://backend.id4i.de/docs/redoc/index.html#operation/updateRoutingFile} We’ll use the programmatic approach in a following step later on.
We can use the example routing file from Routing as a starting point and copy it into the right editor pane. You can either edit the JSON source directly in the right pane or use editor controls in the left one. Use the buttons at the bottom to copy the contents back and forth between the two panes. Upon saving, the contents of the left pane are stored.
So go ahead, copy the example from Example Routing File and play around with editor for a bit. Also create some invalid content and look at the validation messages.
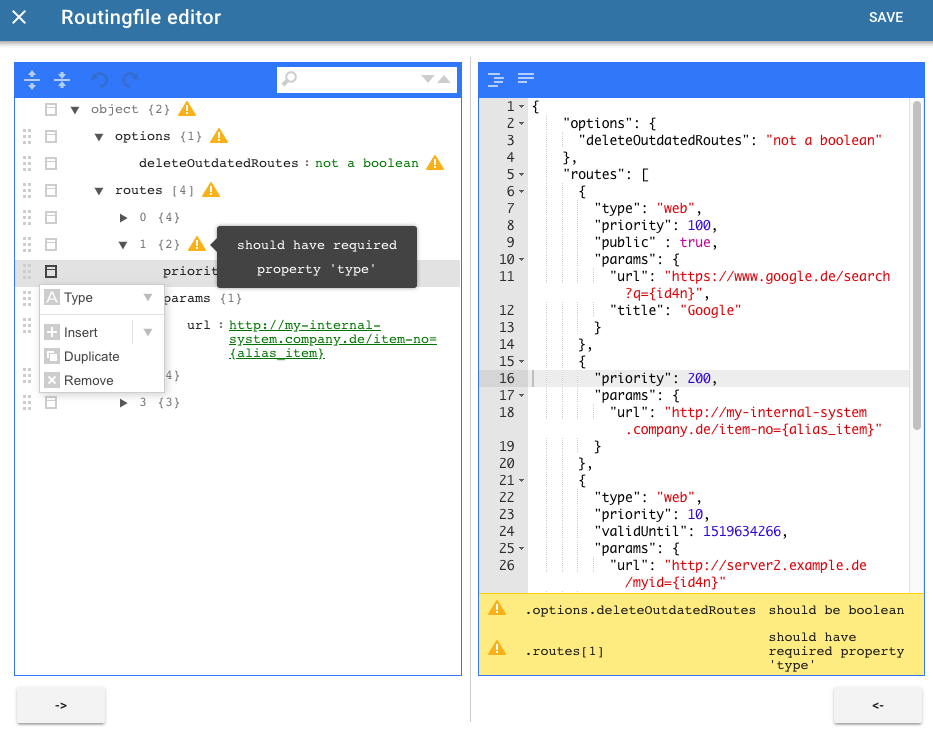
Our first public route will search google for our ID. To do so, remove all routes but one and set its properties as follows
and save the routing file.
Note that the parameter {id4n} will be interpolated to match the GUID that is routed.
For further details on the contents see Routing.
{
    "type": "web",
    "priority": 100,
    "public": true,
    "params": {
        "url": "https://www.google.de/search?q={id4n}"
    }
}
To test this route, open the QR code of a GUID from the routing collection and click Open or scan the code with a mobile device.
This will send you to a google search for the GUID - which will probably return nothing too useful.
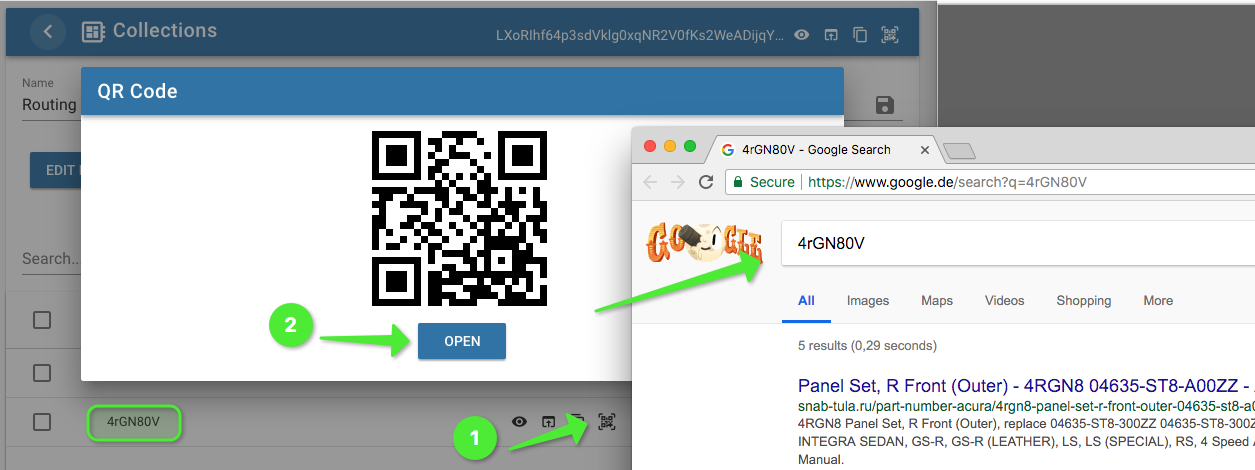
Change a route using the client API
So let’s fix that by searching for a public product alias, the GTIN. Also, let’s search on Amazon instead of using Google.
We will change the URL to https://www.amazon.de/s/&field-keywords={alias_gtin}, save the routing file and run the search again.
But instead of doing this in the editor, we’ll retrieve the route definition using an API client, change it and upload it again.
We will also add the GTIN alias (as already shown previously) to be able to use it in that route.
To be able to do that, you may need to give your API key additional permissions.
We’ll need two IDs to be able to make our API calls: the GUID we want to route and the ID of the routing collection.
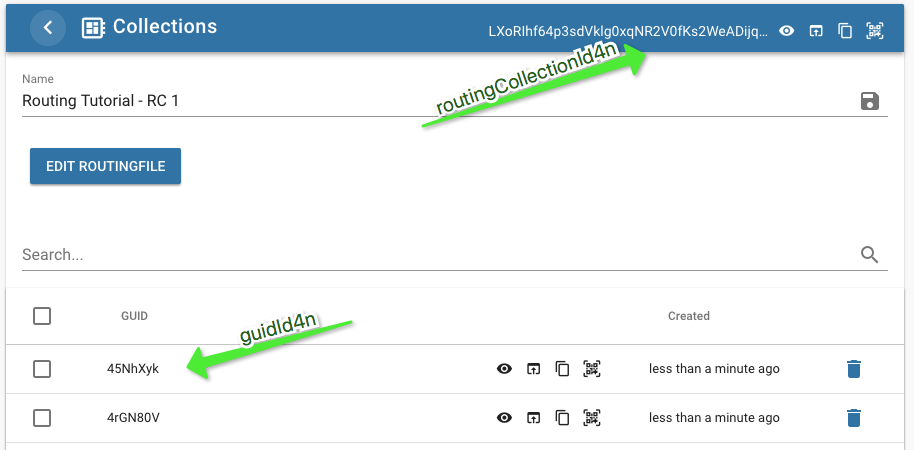
You can set up a new client project as shown in the first tutorial or reuse an existing one. Or just hop over to GitHub and use the sources from there.
String guidId4n = "8yh...snip...KLQq"; // the GUID we work with in this tutorial (1)
String routingCollectionId4n = "A-x...snip...jZHHZ-"; // the ID of the routing collection we work with (2)

GuidAlias gtinAlias = new GuidAlias();
gtinAlias.setAlias("0345391802");
guidsApi.addGuidAlias(guidId4n, "gtin", gtinAlias); (3)
System.out.println("Added GTIN alias " + gtinAlias.getAlias() + " to " + guidId4n);

RoutingFile routingFile = routingApi.getRoutingFile(routingCollectionId4n, organizationId ); (4)
Route firstRoute = routingFile.getRoutes().get(0);
System.out.println("First route of routing collection " + routingCollectionId4n);
System.out.println(firstRoute);| 1 | Id4n of the GUID to route |
| 2 | Id4n of the routing collection |
| 3 | Write GTIN alias to GUID |
| 4 | Download routing file |
Now we want to modify the route and upload it again.
You’ll notice that the URL is hidden in a Map inside a route. This is because route objects can be used for very different
kinds of routes that can need arbitrary data. You can use this map to attach information to routes and use them in your API client
when you are talking to systems to integrate.
// we retrieved the routing file before, see above.

firstRoute.getParams().put("url", "https://www.amazon.de/s/&field-keywords={alias_gtin}");

RoutingFileRequest routingFileRequest = new RoutingFileRequest();
routingFileRequest.setRouting(routingFile);
routingApi.updateRoutingFile(routingFileRequest, routingCollectionId4n);
After you ran that code, open the web interface again to see your changes reflected in the routing file editor. You need to reload the collection detail page for that.
Open the GUIDs QR code again and see where it redirects you to now. Note that code/ the URI it links to did not change. It
always points to the public /go service for the GUID which figures out which route to use.
Routing & Forwarding
Here is what happened behind the scenes when you were following the link in the QR code.
-
The browser opened
https://sandbox.id4i.de/go/8yhyErStsVpjKLQq -
The request was handled by the
goservice, see https://backend.id4i.de/docs/redoc/index.html#operation/go} -
This service determined the public route for the given GUID of type
webwith the highestpriority -
It then interpolated the URI template of that route using the GTIN alias of the routed GUID
-
Then it sent a HTTP 307 (temporary redirect) to the interpolated URI back
-
Your browser then opened that URL
Using private routes
If you want to work with private routes, the principles are the same: You set up your routing rules, request the rules from the routing service and redirect calls to the returned route. By doing so, you are able to define and reuse routes in ID4i but also call internal systems that are not exposed to the internet. They only have to be available from the network your client runs in, allowing for secure integration between internal and external systems using ID4i.
Let’s create a private route with custom (i.e. API client defined) routing parameters using our API client. Then, we simply add it to the RoutingFile object we retrieved earlier and push it back to the server.
Route privateRoute = new Route();
privateRoute.setPublic(false); (1)
privateRoute.setType("my-custom-route-type"); (2)
privateRoute.setPriority(10); (3)

Map<String, String > routeParams = new HashMap<>(); (4)
routeParams.put("host","localhost");
routeParams.put("port","8080");
routeParams.put("path","/something/internal");
routeParams.put("foo", "bar");
privateRoute.setParams(routeParams);
System.out.println("Created private route " + privateRoute);

routingFile.getRoutes().add(privateRoute);
System.out.println("Added new route to existing routing file");

routingApi.updateRoutingFile(routingFileRequest, routingCollectionId4n);
System.out.println("Updated routing file with a new private route");| 1 | Make the new route private. It cannot be used for public routing. |
| 2 | Set a custom route type to distinguish the routes you define |
| 3 | Set a priority that is used to find out the 'best' current route for a GUID. See Routing. |
| 4 | Add arbitrary String key/value pairs as custom parameters for your route |
You can review the change you just made in the routing file editor.
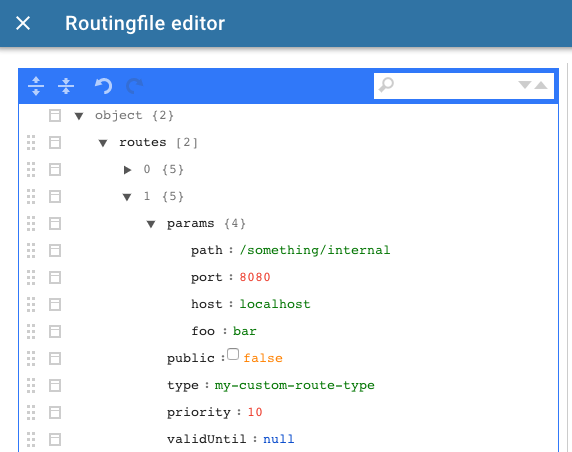
You can add any number of routes to a routing collection. However, at any given time, there is only one route per type active per GUID based on the priority. The routing service we will now query will always return the route with the highest priority of the given type. You can also request routes as they would be seen by an different organization if you / the API key has the corresponding permissions.
We can now retrieve the route again. Typically, defining routes and using them will be two distinct concerns and be implemented in different API clients. Often, the route definition will just be a manual configuration task in the UI.
Route currentRoute =  routingApi.getRoute(
    guidId4n, (1)
    "my-custom-route-type", (2)
    true, (3)
    false, (4)
    false); (5)

System.out.println("Retrieved current route for GUID " + guidId4n + ":");
System.out.println(currentRoute);| 1 | The GUID to request the route for. Note that this is not the collection ID but the actual GUID |
| 2 | The route type you used when creating the route |
| 3 | Request private routes |
| 4 | Do not request public routes |
| 5 | Do not interpolate the URL parameters |
If you get a 404 when retrieving the route, check whether your API key has the permission READ_PRIVATE_ROUTES.
|
To recap what we did in this tutorial: You learned how to …
-
… prepare for routing GUIDs by setting up a routing collection
-
… define routes in a routing file using the routing file editor
-
… use public routes via the
/goservice -
… that routes can be parameterized and interpolated using the ID and aliases
-
… define routes programmatically
-
… created private custom routes
-
… retrieve current routes for GUIDs from the server
The complete sources of this tutorial can be found on GitHub
How to exchange data on ID4i
One of the key features of ID4i is the possibility to exchange data within your own and between different Organizations. The Storage and Transfer chapters describe different scenarios for data exchange. One way is to attach documents to GUIDs or Collections, a second way is to save unstructured character data on GUID level.
Storing documents
Let’s start by attaching documents. We assume you already have an ID4i account and API Keys with the
CREATE_DOCUMENTS permission set up. We’ll also skip
initializing the client, please refer to the previous tutorials for that.
We first create a GUID, then we add a document from the classpath.
public String createGuid() throws ApiException {
    CreateGuidRequest createGuidRequest = new CreateGuidRequest();
    createGuidRequest.setCount(1);
    createGuidRequest.setLength(6);
    createGuidRequest.setOrganizationId(organizationId);

    ListOfId4ns createdGuids =
        guidsApi.createGuid(createGuidRequest);

    return createdGuids.getId4ns().get(0);
}// Assume initialized ApiClient myCustomApiClient
StorageApi storageApi = new StorageApi(myCustomApiClient);
File file = new File(classLoader.getResource("lieferschein.pdf").getFile()); (1)
String organizationId = ... (2)
try {
String guid = createGuid();
System.out.println("Created a GUID: " + guid);
Document document = storageApi.createDocument(organizationId, guid, f);
System.out.println(document);
} catch (ApiException e) {
ApiError apiError = deserialize(e); (3)
System.err.println(apiError);
e.printStackTrace();
}| 1 | Assume the file is on the classpath, e.g. in src/main/resources |
| 2 | Get organization ID from some configuration facility |
| 3 | Deserialize the API Error as shown in ID4iApiUtils in the sample code on GitHub |
The created document should look like the following snippet on the console. If you search for the GUID in the web interface, you will now see this document as shown in the screenshot.
But what does the lock icon and the visibility section in the JSON representation mean? You will have guessed
that the visibility controls who can view the document. If __public is set to true, the document is publicly available.
You would use this e.g. for official data sheets. If it is false only members of your organization having the permission
to read documents (READ_DOCUMENTS, obviously) can see it. For details on what happens if you transfer documents to
another organization and shared visibility, see Transfer and Private Labelling. Note that per default, the visibility
is private.
Created a GUID: B2bnXF (1)
class Document {
    filename: lieferschein.pdf
    mimeType: application/pdf
    visibility: class Visibility {
        _public: false
        sharedOrganizationIds: []
    }
}| 1 | Search for this GUID in the web interface |
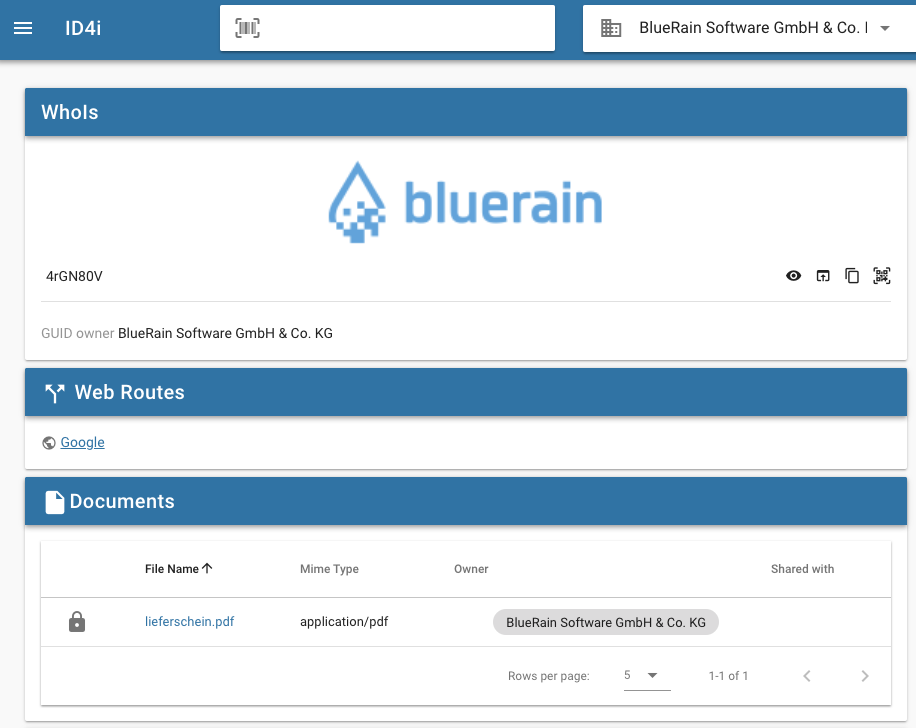
Now, if you want to publish the document, you need to update the visibility like this. If you want to use sharing, please read Transfer and contact us so we can tell you more on how to acquire the sharing module.
In the sample on GitHub, we uploaded two documents and published one of them as shown in the screen shot below.
DocumentUpdate documentUpdate = new DocumentUpdate();
VisibilityUpdate visibility = new VisibilityUpdate();
visibility.setPublic(true);
documentUpdate.setVisibility(visibility);
storageApi.updateDocumentMetadata(organizationId, guid, f.getName(), documentUpdate);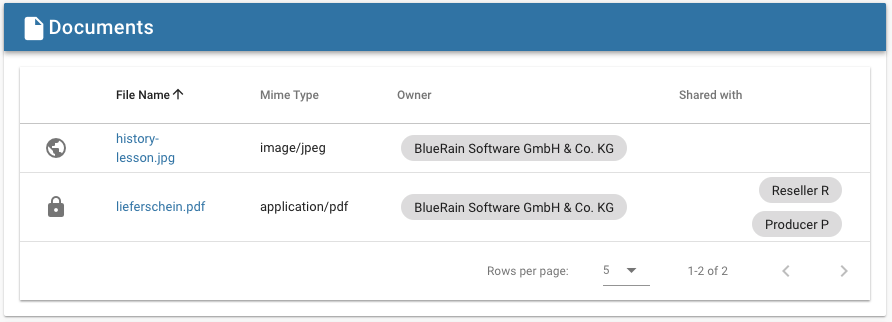
Using Micro Storage
Micro storage is a small amount of space (1kB) that can be used to transfer arbitrary data. Data in micro storage is always private and cannot be shared. You’d typically use it along the manufacturing process to let workstations / machines exchange data regarding a GUID.
Using it is simple as you can see from the following snippet.
String content = "my arbitrary character content. Could be xml, JSON or anything. Go wild.";
storageApi.writeToMicrostorage(
    organizationId,
    guid,
    "text/plain",
    Long.valueOf(content.getBytes(StandardCharsets.UTF_8).length),
    content.getBytes(StandardCharsets.UTF_8)
);

System.out.println(
    new String(storageApi.readFromMicrostorage(organizationId, guid),
    StandardCharsets.UTF_8)
);| Why do we use byte arrays for micro storage instead of strings? We want to allow arbitrary data in mircro storage, not only character data. ID4i does not interpret the data / encoding in micro storage. The client is responsible for interpreting the storage’s contents. |
In this tutorial, we have seen how to …
-
… upload documents to GUIDs
-
… change the visibility of documents
-
… write to and read from micro storage
The complete sources of this tutorial can be found on GitHub
How to troubleshoot failing API calls
In case an API call fails, you should receive a meaningful error message ⇒ See API Error & error-codes.
If this is not the case, please file a bug report including the HTTP-request sent by a HTTP-level tool
like curl, postman, wget or such.
Having extracted the request, it’s easy to play around with the values you passed to find out the root cause and make the fix in your app.
How to find out the actual call that happens behind the scenes depends on the client technology.
Javascript
When running JS in the browser, open your developer tools and look into the network connections. We like to use Chrome, but other browsers have these, too, obviously.
Locate the failing request (it should be highlighted in red) and select it. You can now see all the headers that where exchanged and the API Error representation. There should be a useful error message in there. It also has an error code and a unique error ID. If you contact us, please let us know these, so we can find the corresponding log events easily.
You can copy the complete request in various formats (e.g. curl and HAR) to play around with in other tools by using the context menu on the failed request as shown below. Note that you can simply import a curl commandline into Postman, which is incredibly useful. Thanks, social media: https://twitter.com/adrian_philipp/status/710438593936932864
{
  "message":"Session timed out or provided authorization token expired.",
  "code":"ERR_AUTHENTICATION_EXPIRED_TOKEN",
  "errorId":"e5bf7e6d-2432-4d84-9c2a-f18473bd4ffd"
}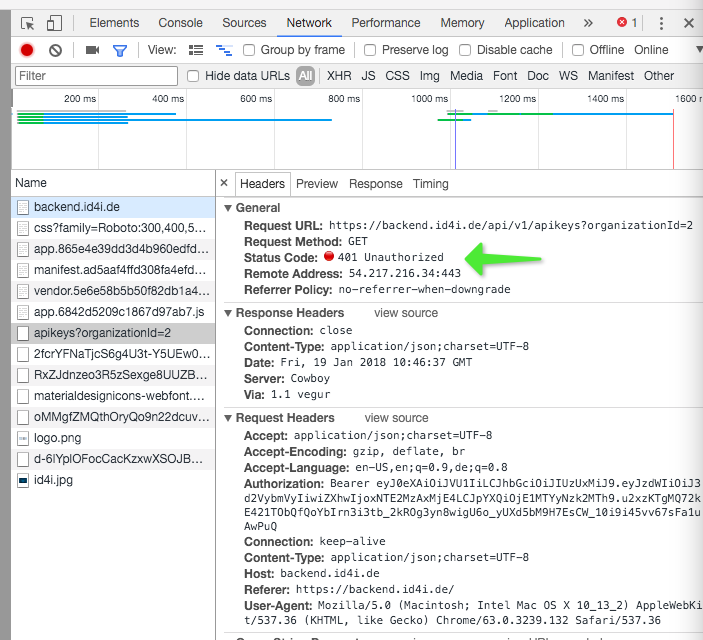
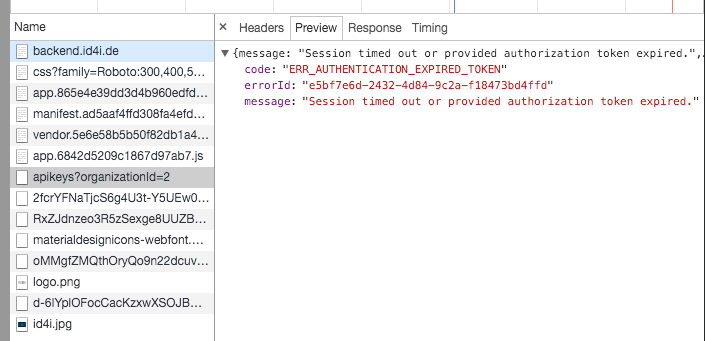
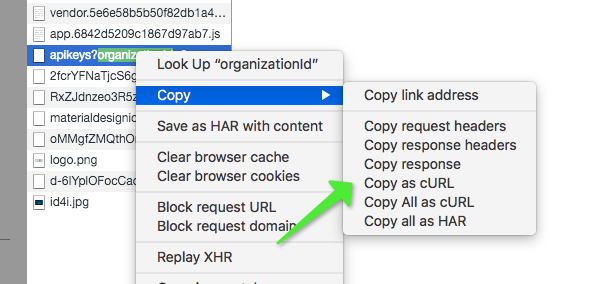
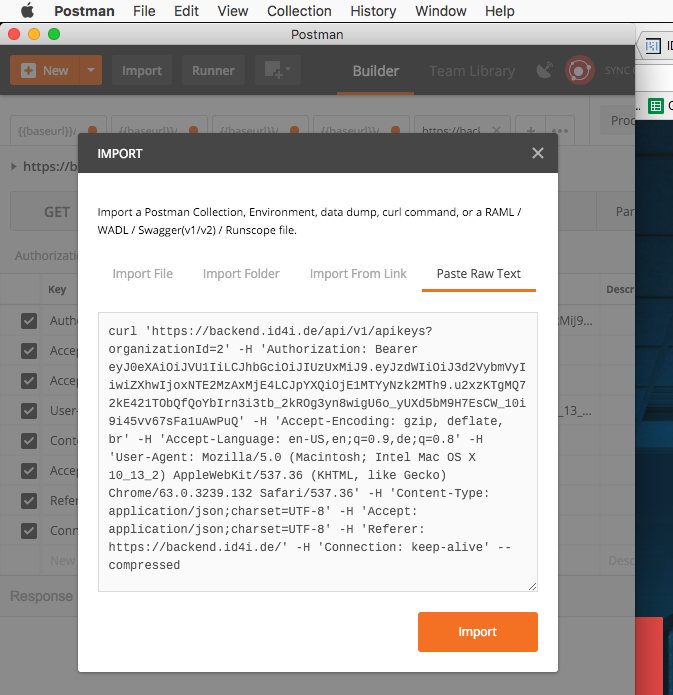
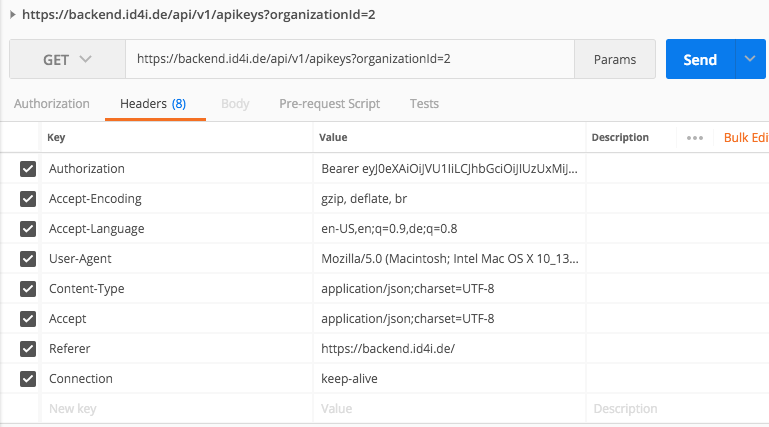
Java
For each simple API operation, there is a variety withHttpInfo that contains additional information.
One simple way to see what is going on is to temporarily use this one and inspect the contents using
your debugger.
For example, a call like AppInfoPresentation result = apiInstance.applicationInfo() would become ApiResponse<AppInfoPresentation> result = apiInstance.applicationInfoWithHttpInfo()
If this is not sufficient, you want to look into the library code at the location where the call is executed. This is
de.id4i.ApiClient#execute(com.squareup.okhttp.Call, java.lang.reflect.Type). The Call object has all the information
needed as shown in the screen shot below.
In case the call completely fails (as opposed to just not behaving as expected), you can look into the thrown ApiException.
Its body corresponds to an ApiError object like in the JS example above.
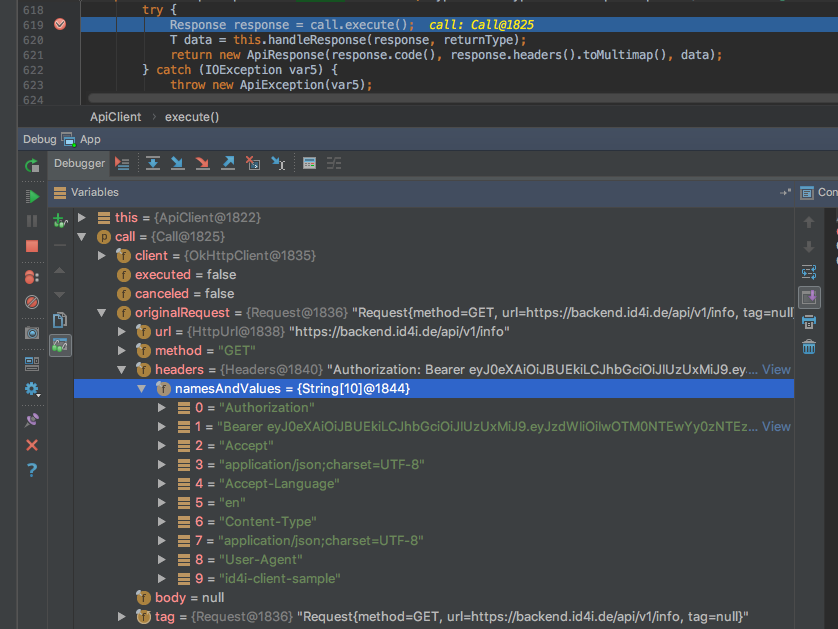
Definitions
AccountCredentials
| Name | Description | Schema |
|---|---|---|
login |
Example : |
string |
password |
Example : |
string |
AddApiKeyPrivilegeRequest
| Name | Description | Schema |
|---|---|---|
privilege |
Example : |
string |
AddPartnerRequest
| Name | Description | Schema |
|---|---|---|
organizationId |
The namespace of the partner organization to add |
string |
ApiError
| Name | Description | Schema |
|---|---|---|
code |
Example : |
enum (ERR_REGISTRATION_VERIFICATION_NO_TOKEN, ERR_REGISTRATION_VERIFICATION_INVALID_TOKEN, ERR_REGISTRATION_VERIFICATION_EXPIRED_TOKEN, ERR_AUTHENTICATION_NO_TOKEN, ERR_AUTHENTICATION_INVALID_TOKEN, ERR_AUTHENTICATION_EXPIRED_TOKEN, ERR_AUTHENTICATION_FAILED, ERR_AUTHORIZATION_MISSING_PRIVILEGES, ERR_AUTHORIZATION_FORBIDDEN, ERR_AUTHORIZATION_REQUIRE_USER, ERR_INPUT_VALIDATION_FAILED, ERR_FIELD_INPUT_VALIDATION_FAILED, ERR_VALIDATION_CONSTRAINT_FAILED, ERR_INPUT_NOT_READABLE, ERR_INVALID_INPUT_PARAMETER, ERR_GUID_CREATION, ERR_INVALID_ID4N_OBJECT_TYPE, ERR_MISSING_BILLING_INFORMATION, ERR_COLLECTION_UPDATE_DENIED, ERR_ENTITY_NOT_FOUND, ERR_ENTITY_TOO_BIG, ERR_DUPLICATE, ERR_INTERNAL, ERR_UNKNOWN, ERR_INVALID_ORGANIZATION_USERROLE, ERR_ORGANIZATION_ROLE_INCONSISTENCY, ERR_ORGANIZATION_NOT_DELETABLE, ERR_USER_ALREADY_IN_ORGANIZATION, ERR_USER_INVITATION_NEEDS_MINIMUM_ONE_ROLE, ERR_USER_INVITATION_SPECIFY_EMAIL_OR_USERNAME, ERR_USER_DEACTIVATED, ERR_LANGUAGE_NOT_SUPPORTED, ERR_EMAIL_MISSING_TEMPLATE_PARAM, ERR_EMAIL_TEMPLATE_NOT_AVAILABLE, ERR_EMAIL_PREPARATION_FAILED, ERR_IMAGE_CONVERSION, ERR_UPLOAD_TOO_LARGE, ERR_INVALID_ALIAS_TYPE, ERR_INVALID_URI_TEMPLATE, ERR_INVALID_URI_TEMPLATE_VARIABLE, ERR_INVALID_NAMESPACE, ERR_NAMESPACE_ALREADY_EXISTS, ERR_INSECURE_PASSWORD, ERR_TRANSFER_DENIED, ERR_INVALID_PHYSICAL_STATE, ERR_INVALID_HISTORY_PROPERTY_NAMESPACE, ERR_INVALID_HISTORY_PROPERTY_VALUE, ERR_ORGA_CANNOT_BE_OWN_PARTNER) |
errorId |
Example : |
string |
errorList |
Example : |
< ApiError > array |
message |
Example : |
string |
ApiKeyChangeRequest
| Name | Description | Schema |
|---|---|---|
active |
Example : |
boolean |
newLabel |
Length : |
string |
ApiKeyCreationRequest
| Name | Description | Schema |
|---|---|---|
label |
Length : |
string |
organizationId |
Example : |
string |
secret |
Length : |
string |
ApiKeyPresentation
| Name | Description | Schema |
|---|---|---|
active |
Whether this API key is active |
boolean |
createdAt |
The UTC unix timestamp of when this api key has been created |
integer (int64) |
createdBy |
Example : |
string |
key |
The api key identifier |
string |
label |
The label / name of the api key |
string |
organizationId |
The organization namespace this api key belongs to |
string |
ApiKeyPrivilege
| Name | Description | Schema |
|---|---|---|
id4nAssociated |
Example : |
boolean |
privilege |
Example : |
string |
ApiKeyPrivilegeInfo
| Name | Description | Schema |
|---|---|---|
allowsBillableOperations |
Example : |
boolean |
helpText |
Example : |
string |
id4nAssociated |
Example : |
boolean |
name |
Example : |
string |
AppInfoPresentation
| Name | Description | Schema |
|---|---|---|
branch |
Example : |
string |
commitTime |
Example : |
string |
name |
Example : |
string |
productionMode |
Example : |
boolean |
revision |
Example : |
string |
version |
Example : |
string |
BillingPosition
| Name | Description | Schema |
|---|---|---|
amount |
Example : |
integer (int64) |
count |
Example : |
number |
description |
Example : |
string |
service |
Example : |
string |
singlePrice |
Example : |
number |
sum |
Example : |
number |
unit |
Example : |
string |
ChangeLogEntry
A changelog entry
| Name | Description | Schema |
|---|---|---|
id |
The unique id of the changelog entry |
string |
message |
The message as template or rendered as plain text |
string |
messageProperties |
The values of the properties in the message. May be nested as object with a value field |
< string, object > map |
timestamp |
The UTC unix timestamp when this change occurred |
integer (int64) |
ChangeRoleRequest
| Name | Description | Schema |
|---|---|---|
roles |
Example : |
< string > array |
CompleteUserRegistrationRequest
| Name | Description | Schema |
|---|---|---|
password |
Length : |
string |
username |
Pattern : |
string |
verificationToken |
Example : |
string |
Country
| Name | Description | Schema |
|---|---|---|
code |
Example : |
string |
name |
Example : |
string |
CreateCollectionRequest
| Name | Description | Schema |
|---|---|---|
label |
Length : |
string |
length |
Minimum value : |
integer (int32) |
organizationId |
Example : |
string |
type |
Example : |
enum (ROUTING_COLLECTION, LOGISTIC_COLLECTION, LABELLED_COLLECTION) |
CreateGuidRequest
GUID creation information
| Name | Description | Schema |
|---|---|---|
count |
The total number of GUIDs to create |
integer (int32) |
length |
The charactersequence length of the GUID |
integer (int32) |
organizationId |
The namespace of the organization where the generated GUIDs should be assigned. |
string |
Document
| Name | Description | Schema |
|---|---|---|
filename |
File Name |
string |
mimeType |
Mime Type |
string |
ownerOrganizationId |
The organization’s namespace which owns the document |
string |
visibility |
Visibility configuration |
DocumentUpdate
| Name | Description | Schema |
|---|---|---|
filename |
File Name |
string |
mimeType |
Mime Type |
string |
visibility |
Visibility configuration |
Guid
| Name | Description | Schema |
|---|---|---|
createdTimestamp |
The UTC unix timestamp of when this GUID has been created |
integer (int64) |
holderOrganizationId |
Organization namespace of the GUID holder |
string |
id4n |
The ID |
string |
ownerOrganizationId |
Organization namespace of the GUID owner |
string |
physicalState |
Physical attachment state of the GUID |
enum (UNATTACHED, ATTACHED, DETACHED) |
GuidAlias
| Name | Description | Schema |
|---|---|---|
alias |
An alias |
string |
GuidCollection
| Name | Description | Schema |
|---|---|---|
createdTimestamp |
The UTC unix timestamp of when this collection has been created |
integer (int64) |
holderOrganizationId |
Organization namespace of the holder of the collection |
string |
id4n |
The ID |
string |
label |
Length : |
string |
ownerOrganizationId |
Organization namespace of the collection owner |
string |
physicalState |
Physical attachment state of the collection |
enum (UNATTACHED, ATTACHED, DETACHED) |
type |
Example : |
enum (ROUTING_COLLECTION, LOGISTIC_COLLECTION, LABELLED_COLLECTION) |
HistoryItem
GUID history item
| Name | Description | Schema |
|---|---|---|
additionalProperties |
History items custom additional properties |
< string, string > map |
organizationId |
Originator of the history item |
string |
ownerOrganizationId |
Owner of the history item |
string |
sequenceId |
Forms the primary key of the history item together with the GUID and the organizationId |
integer (int32) |
timestamp |
History item timestamp |
integer (int64) |
type |
Type of the history item |
enum (CREATED, DESTROYED, RECYCLED, SHIPMENT_PREPARED, STORED, RETRIEVED_FROM_STORAGE, PACKAGED, DISPATCHED, RECEIVED, REPROCESSING_STARTED, REPROCESSING_STEP_STARTED, REPROCESSING_STEP_CANCELLED, REPROCESSING_STEP_FINISHED, REPROCESSING_CANCELLED, REPROCESSING_FINISHED, DISASSEMBLED, MAINTENANCE_STARTED, MAINTENANCE_STEP_STARTED, MAINTENANCE_STEP_CANCELLED, MAINTENANCE_STEP_FINISHED, MAINTENANCE_CANCELLED, MAINTENANCE_FINISHED, PRODUCTION_STARTED, PRODUCTION_CANCELLED, PRODUCTION_FINISHED, PRODUCTION_STEP_STARTED, PRODUCTION_STEP_CANCELLED, PRODUCTION_STEP_FINISHED, QUALITY_CHECK_PERFORMED) |
visibility |
History item visibility restrictions |
HistoryItemUpdate
GUID history item update (diff patch)
| Name | Description | Schema |
|---|---|---|
organizationId |
New organization id displayed for this item. If given, must match the holder of GUID and the organization the history item is found under. |
string |
visibility |
History item visibility restrictions |
Id4n
| Name | Description | Schema |
|---|---|---|
id4n |
The ID |
string |
Id4nPresentation
| Name | Description | Schema |
|---|---|---|
createdTimestamp |
The UTC unix timestamp of when this ID has been created |
integer (int64) |
holderOrganizationId |
Organization namespace of the holder of the ID |
string |
id4n |
The ID |
string |
label |
Example : |
string |
ownerOrganizationId |
Organization namespace of the ID owner |
string |
type |
The type of ID |
enum (GUID, ROUTING_COLLECTION, LOGISTIC_COLLECTION, LABELLED_COLLECTION) |
ListOfId4ns
A list of id4ns
| Name | Description | Schema |
|---|---|---|
id4ns |
A list of id4ns. |
< string > array |
Organization
An organization
| Name | Description | Schema |
|---|---|---|
id |
The id of the organization ( Deprecated: Use namespace instead. ) |
integer (int64) |
logoURL |
URL to a logo of the organization |
string |
name |
The name of the organization |
string |
namespace |
The namespace of the organization |
string |
OrganizationAddress
| Name | Description | Schema |
|---|---|---|
city |
Length : |
string |
companyName |
Length : |
string |
countryCode |
The ISO 3166 two-letter country code |
string |
countryName |
The country name |
string |
firstname |
Length : |
string |
lastname |
Length : |
string |
postCode |
Length : |
string |
street |
Length : |
string |
telephone |
The telephone number e.g. |
string |
OrganizationUpdate
An organization
| Name | Description | Schema |
|---|---|---|
name |
The name of the organization |
string |
OrganizationUserInvitation
| Name | Description | Schema |
|---|---|---|
email |
Example : |
string |
roles |
Example : |
< string > array |
userName |
Example : |
string |
OrganizationUserInvitationListRequest
| Name | Description | Schema |
|---|---|---|
invitations |
Example : |
< OrganizationUserInvitation > array |
PaginatedResponseOfApiKeyPresentation
| Name | Description | Schema |
|---|---|---|
elements |
Example : |
< ApiKeyPresentation > array |
limit |
The number of returned elements |
integer (int32) |
offset |
Starting with the n-th element |
integer (int32) |
total |
The total number of elements |
integer (int32) |
PaginatedResponseOfApiKeyPrivilege
| Name | Description | Schema |
|---|---|---|
elements |
Example : |
< ApiKeyPrivilege > array |
limit |
The number of returned elements |
integer (int32) |
offset |
Starting with the n-th element |
integer (int32) |
total |
The total number of elements |
integer (int32) |
PaginatedResponseOfApiKeyPrivilegeInfo
| Name | Description | Schema |
|---|---|---|
elements |
Example : |
< ApiKeyPrivilegeInfo > array |
limit |
The number of returned elements |
integer (int32) |
offset |
Starting with the n-th element |
integer (int32) |
total |
The total number of elements |
integer (int32) |
PaginatedResponseOfChangeLogEntry
| Name | Description | Schema |
|---|---|---|
elements |
Example : |
< ChangeLogEntry > array |
limit |
The number of returned elements |
integer (int32) |
offset |
Starting with the n-th element |
integer (int32) |
total |
The total number of elements |
integer (int32) |
PaginatedResponseOfCountry
| Name | Description | Schema |
|---|---|---|
elements |
Example : |
< Country > array |
limit |
The number of returned elements |
integer (int32) |
offset |
Starting with the n-th element |
integer (int32) |
total |
The total number of elements |
integer (int32) |
PaginatedResponseOfDocument
| Name | Description | Schema |
|---|---|---|
elements |
Example : |
< Document > array |
limit |
The number of returned elements |
integer (int32) |
offset |
Starting with the n-th element |
integer (int32) |
total |
The total number of elements |
integer (int32) |
PaginatedResponseOfGuid
| Name | Description | Schema |
|---|---|---|
elements |
Example : |
< Guid > array |
limit |
The number of returned elements |
integer (int32) |
offset |
Starting with the n-th element |
integer (int32) |
total |
The total number of elements |
integer (int32) |
PaginatedResponseOfGuidCollection
| Name | Description | Schema |
|---|---|---|
elements |
Example : |
< GuidCollection > array |
limit |
The number of returned elements |
integer (int32) |
offset |
Starting with the n-th element |
integer (int32) |
total |
The total number of elements |
integer (int32) |
PaginatedResponseOfHistoryItem
| Name | Description | Schema |
|---|---|---|
elements |
Example : |
< HistoryItem > array |
limit |
The number of returned elements |
integer (int32) |
offset |
Starting with the n-th element |
integer (int32) |
total |
The total number of elements |
integer (int32) |
PaginatedResponseOfId4nPresentation
| Name | Description | Schema |
|---|---|---|
elements |
Example : |
< Id4nPresentation > array |
limit |
The number of returned elements |
integer (int32) |
offset |
Starting with the n-th element |
integer (int32) |
total |
The total number of elements |
integer (int32) |
PaginatedResponseOfOrganization
| Name | Description | Schema |
|---|---|---|
elements |
Example : |
< Organization > array |
limit |
The number of returned elements |
integer (int32) |
offset |
Starting with the n-th element |
integer (int32) |
total |
The total number of elements |
integer (int32) |
PaginatedResponseOfPartnerOrganization
| Name | Description | Schema |
|---|---|---|
elements |
Example : |
< PartnerOrganization > array |
limit |
The number of returned elements |
integer (int32) |
offset |
Starting with the n-th element |
integer (int32) |
total |
The total number of elements |
integer (int32) |
PaginatedResponseOfRole
| Name | Description | Schema |
|---|---|---|
elements |
Example : |
< Role > array |
limit |
The number of returned elements |
integer (int32) |
offset |
Starting with the n-th element |
integer (int32) |
total |
The total number of elements |
integer (int32) |
PaginatedResponseOfUserPresentation
| Name | Description | Schema |
|---|---|---|
elements |
Example : |
< UserPresentation > array |
limit |
The number of returned elements |
integer (int32) |
offset |
Starting with the n-th element |
integer (int32) |
total |
The total number of elements |
integer (int32) |
PaginatedResponseOfUserRoles
| Name | Description | Schema |
|---|---|---|
elements |
Example : |
< UserRoles > array |
limit |
The number of returned elements |
integer (int32) |
offset |
Starting with the n-th element |
integer (int32) |
total |
The total number of elements |
integer (int32) |
PaginatedResponseOfstring
| Name | Description | Schema |
|---|---|---|
elements |
Example : |
< string > array |
limit |
The number of returned elements |
integer (int32) |
offset |
Starting with the n-th element |
integer (int32) |
total |
The total number of elements |
integer (int32) |
PartnerOrganization
A partner organization
| Name | Description | Schema |
|---|---|---|
logoURL |
URL to a logo of the organization |
string |
name |
The name of the organization |
string |
namespace |
The namespace of the organization |
string |
PasswordResetRequest
| Name | Description | Schema |
|---|---|---|
username |
Example : |
string |
PasswordResetVerificationRequest
| Name | Description | Schema |
|---|---|---|
password |
Example : |
string |
token |
Example : |
string |
PublicImagePresentation
| Name | Description | Schema |
|---|---|---|
uri |
The uri/url of the image |
string |
RegistrationVerificationTokenPresentation
| Name | Description | Schema |
|---|---|---|
token |
Example : |
string |
RemoveApiKeyPrivilegeRequest
| Name | Description | Schema |
|---|---|---|
privilege |
Example : |
string |
RemovePartnerRequest
| Name | Description | Schema |
|---|---|---|
organizationId |
The namespace of the partner organization to remove |
string |
Role
| Name | Description | Schema |
|---|---|---|
name |
Example : |
string |
privileges |
Example : |
< string > array |
Route
| Name | Description | Schema |
|---|---|---|
params |
Example : |
< string, string > map |
priority |
Example : |
integer (int32) |
public |
Example : |
boolean |
type |
Example : |
string |
validUntil |
Example : |
integer (int64) |
RoutingFile
| Name | Description | Schema |
|---|---|---|
options |
Example : |
|
routes |
Example : |
< Route > array |
RoutingFileRequest
| Name | Description | Schema |
|---|---|---|
organizationId |
Example : |
string |
routing |
Example : |
RoutingOptions
| Name | Description | Schema |
|---|---|---|
deleteOutdatedRoutes |
Example : |
boolean |
ServiceCosts
| Name | Description | Schema |
|---|---|---|
listing |
Example : |
< string, number > map |
SimpleMessageResponse
| Name | Description | Schema |
|---|---|---|
message |
Example : |
string |
TransferReceiveInfo
| Name | Description | Schema |
|---|---|---|
organizationId |
Organization to take the ownership of the ID. If the sender chose to keep the ownership, this organization becomes the holder. Otherwise, it becomes the new owner. |
string |
TransferSendInfo
| Name | Description | Schema |
|---|---|---|
holderOrganizationId |
The current holder of the object |
string |
keepOwnership |
Keep the public ownership while transferring the object |
boolean |
openForClaims |
Allow anyone who knows (or can scan) the ID4N to claim ownership of this object |
boolean |
ownerOrganizationId |
The current publicly visible owner of the object |
string |
recipientOrganizationIds |
Allow only these organizations to obtain this object |
< string > array |
UserPresentation
| Name | Description | Schema |
|---|---|---|
id |
Example : |
string |
name |
Example : |
string |
UserRegistrationRequest
| Name | Description | Schema |
|---|---|---|
email |
Example : |
string |
password |
Length : |
string |
username |
Pattern : |
string |
UserRegistrationResponse
| Name | Description | Schema |
|---|---|---|
email |
Example : |
string |
id |
Example : |
integer (int64) |
message |
Example : |
string |
username |
Example : |
string |
UserRoles
| Name | Description | Schema |
|---|---|---|
roles |
Example : |
< string > array |
user |
Example : |
Visibility
| Name | Description | Schema |
|---|---|---|
public |
Document is publicly readable (if ID4N is owned by the same organization) |
boolean |
sharedOrganizationIds |
Document is readable by these organizations (independend of ID4N ownership) |
< string > array |
VisibilityUpdate
| Name | Description | Schema |
|---|---|---|
public |
Document is publicly readable (if ID4N is owned by the same organization) |
boolean |
sharedWithOrganizationIds |
Document is readable by these organizations (independend of ID4N ownership) |
< string > array |
WhoIsResponse
| Name | Description | Schema |
|---|---|---|
aliases |
Example : |
< string, string > map |
organization |
Example : |
|
organizationAddress |
Example : |